# Simulon Hub

Simulon Hub is our desktop app which enables the ability to upload custom assets, download take artifacts, render takes aswell as view and edit scenes directly from Blender.

### Setup

Simulon Hub is currently available for both MacOS and Windows. Download the installers from the following links:

* [MacOS installation](https://app.simulon.com/macos/latest/simulon_hub.pkg)
* [Windows installation](https://app.simulon.com/windows/latest/simulon_hub_setup.exe)

Once installed Simulon Hub will automatically discover new updates and prompt to download if there is one available.

To make use of our [Blender Integration](/hub/simulon-hub/blender-integration), ensure you have Blender 4.4.3 or above installed.

{% hint style="warning" %}
**Note**

Simulon Hub is developed closely with the Blender plugins, however it is not required to use the Blender plugins to access features such as Take Artifact downloads (i.e Clean plate, audio and raw camera frame data) and asset upload of .usdz/.glb assets
{% endhint %}


# Usage

Simulon Hub gives you the ability to download and view your renders, takes and scenes.

Simulon Hub allows you to download your scenes, takes and renders. It also allows you to upload custom assets with is covered in the [Custom Asset Preparation](/hub/simulon-hub/blender-integration/custom-asset-preparation) section.&#x20;

After installing, logging into and opening hub you'll be greeted with a window that contains all of your scenes.

<figure><img src="/files/HLgjrkkeITYipd1ai79J" alt=""><figcaption></figcaption></figure>

From here you can click on any of your preferred scenes. You will navigate to the Scene details and all data pertaining to the scene will be downloaded.


# Takes

The takes tab allows you to view, download capture data and render the takes you created from iOS.

Each take listed in the takes tab gives you the ability to export right clicking on a take and click "Export". &#x20;

<figure><img src="/files/D7CvBXjpXChtlFqIpKAn" alt=""><figcaption></figcaption></figure>

You will be shown a pop up to select the specific artifacts you would like to download. Once selected hit Confirm to export.

<figure><img src="/files/eKapY08zRhPI84ubgx2c" alt=""><figcaption></figcaption></figure>

Multiple renders can be created from a single take. This is useful if you would like to have different resolutions rendered of the same take. Also when using [Simulon Link](/hub/simulon-hub/blender-integration/simulon-link), changes made to your Blender scene will be included in newly generated renders.

<figure><img src="/files/2ru8fl4WcpkDHYeRmucx" alt=""><figcaption></figcaption></figure>

Depending on whether you've captured your scene with 4k or 1080p you'll be able to render your take in varying resolutions between 720p - 4k. You are also able to specify the output types.

#### Output Types:

1. **Single-pass:** The final beauty pass of your take. This is a single video or .png.
2. M**ulti-pass:** A .zip containing every layer of the comp. This is useful for creators who want to access each individual layer of the comp for workflows in various frame editing softwares. More on this is covered in [multi-pass section](/hub/simulon-hub/usage/renders#multi-pass-renders)


# Renders

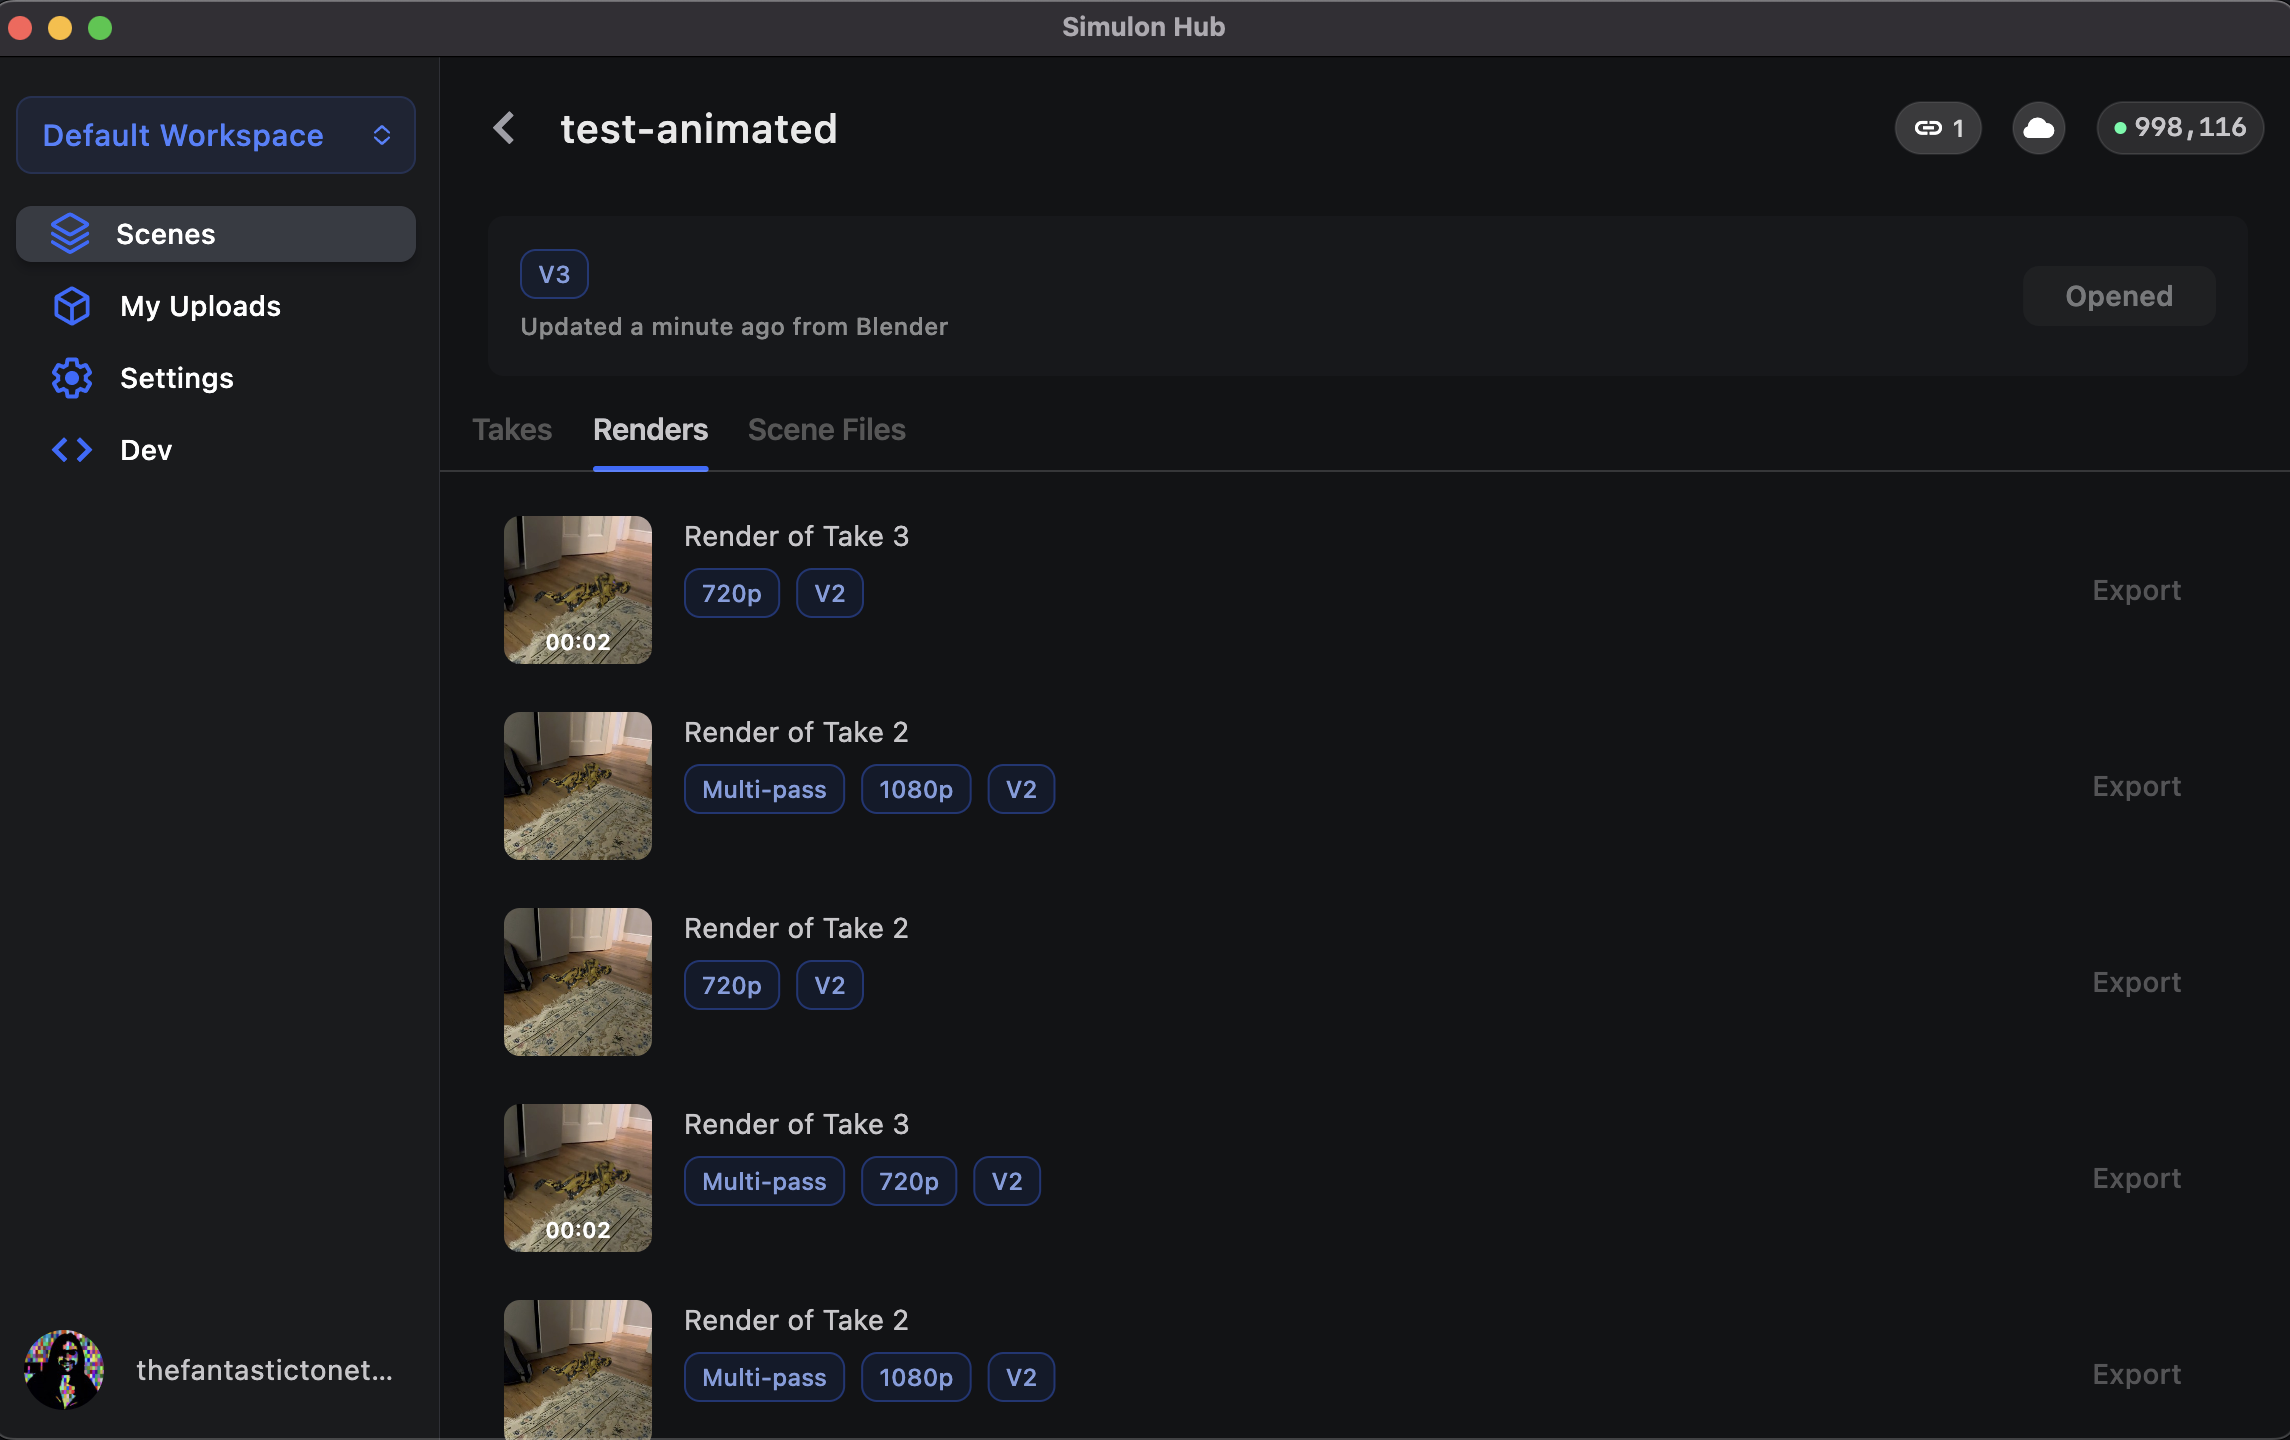
The Renders tab allows you to view and download data from the renders you've created.

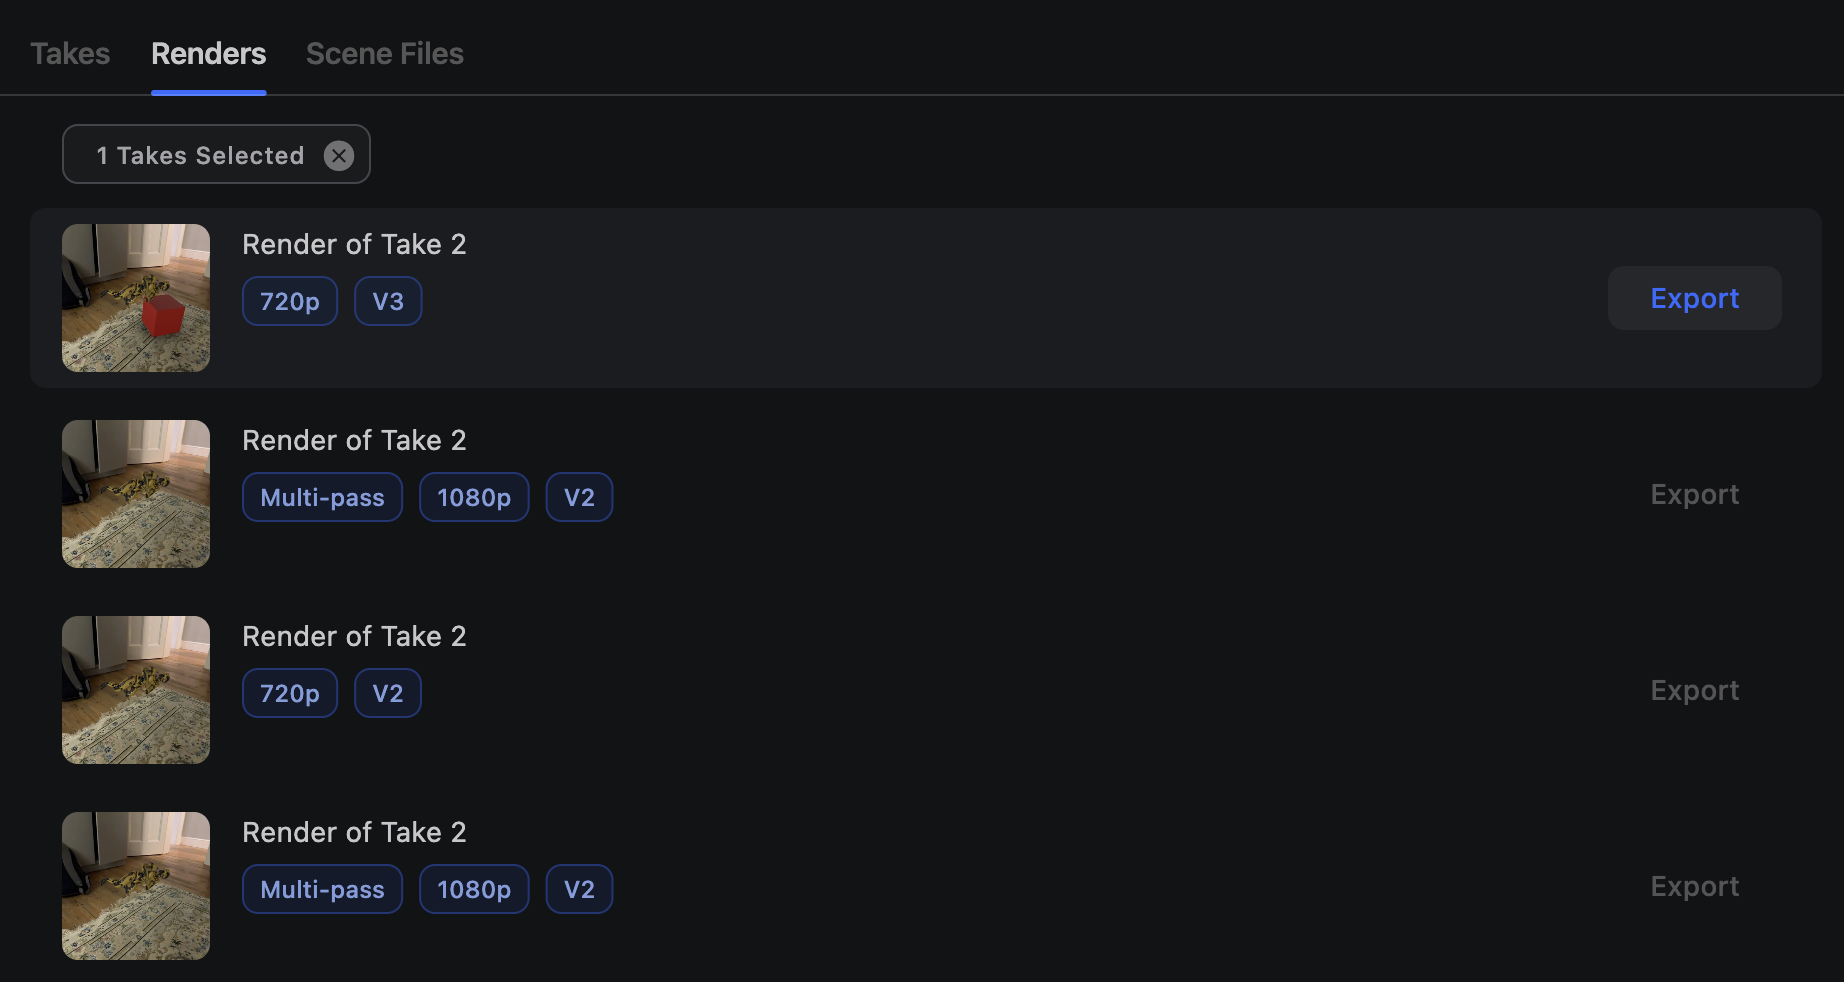
As mentioned in the [Takes](/hub/simulon-hub/usage/takes#renders) renders section, mutiple renders can be created from a single take. The Renders tab allows you to view these and export them. You are able to filter for renders according to a take by selecting the take you'd like to find renders for before navigating the the renders tab.

<figure><img src="/files/my2xJwKwfgYzZpGjtiSC" alt=""><figcaption></figcaption></figure>

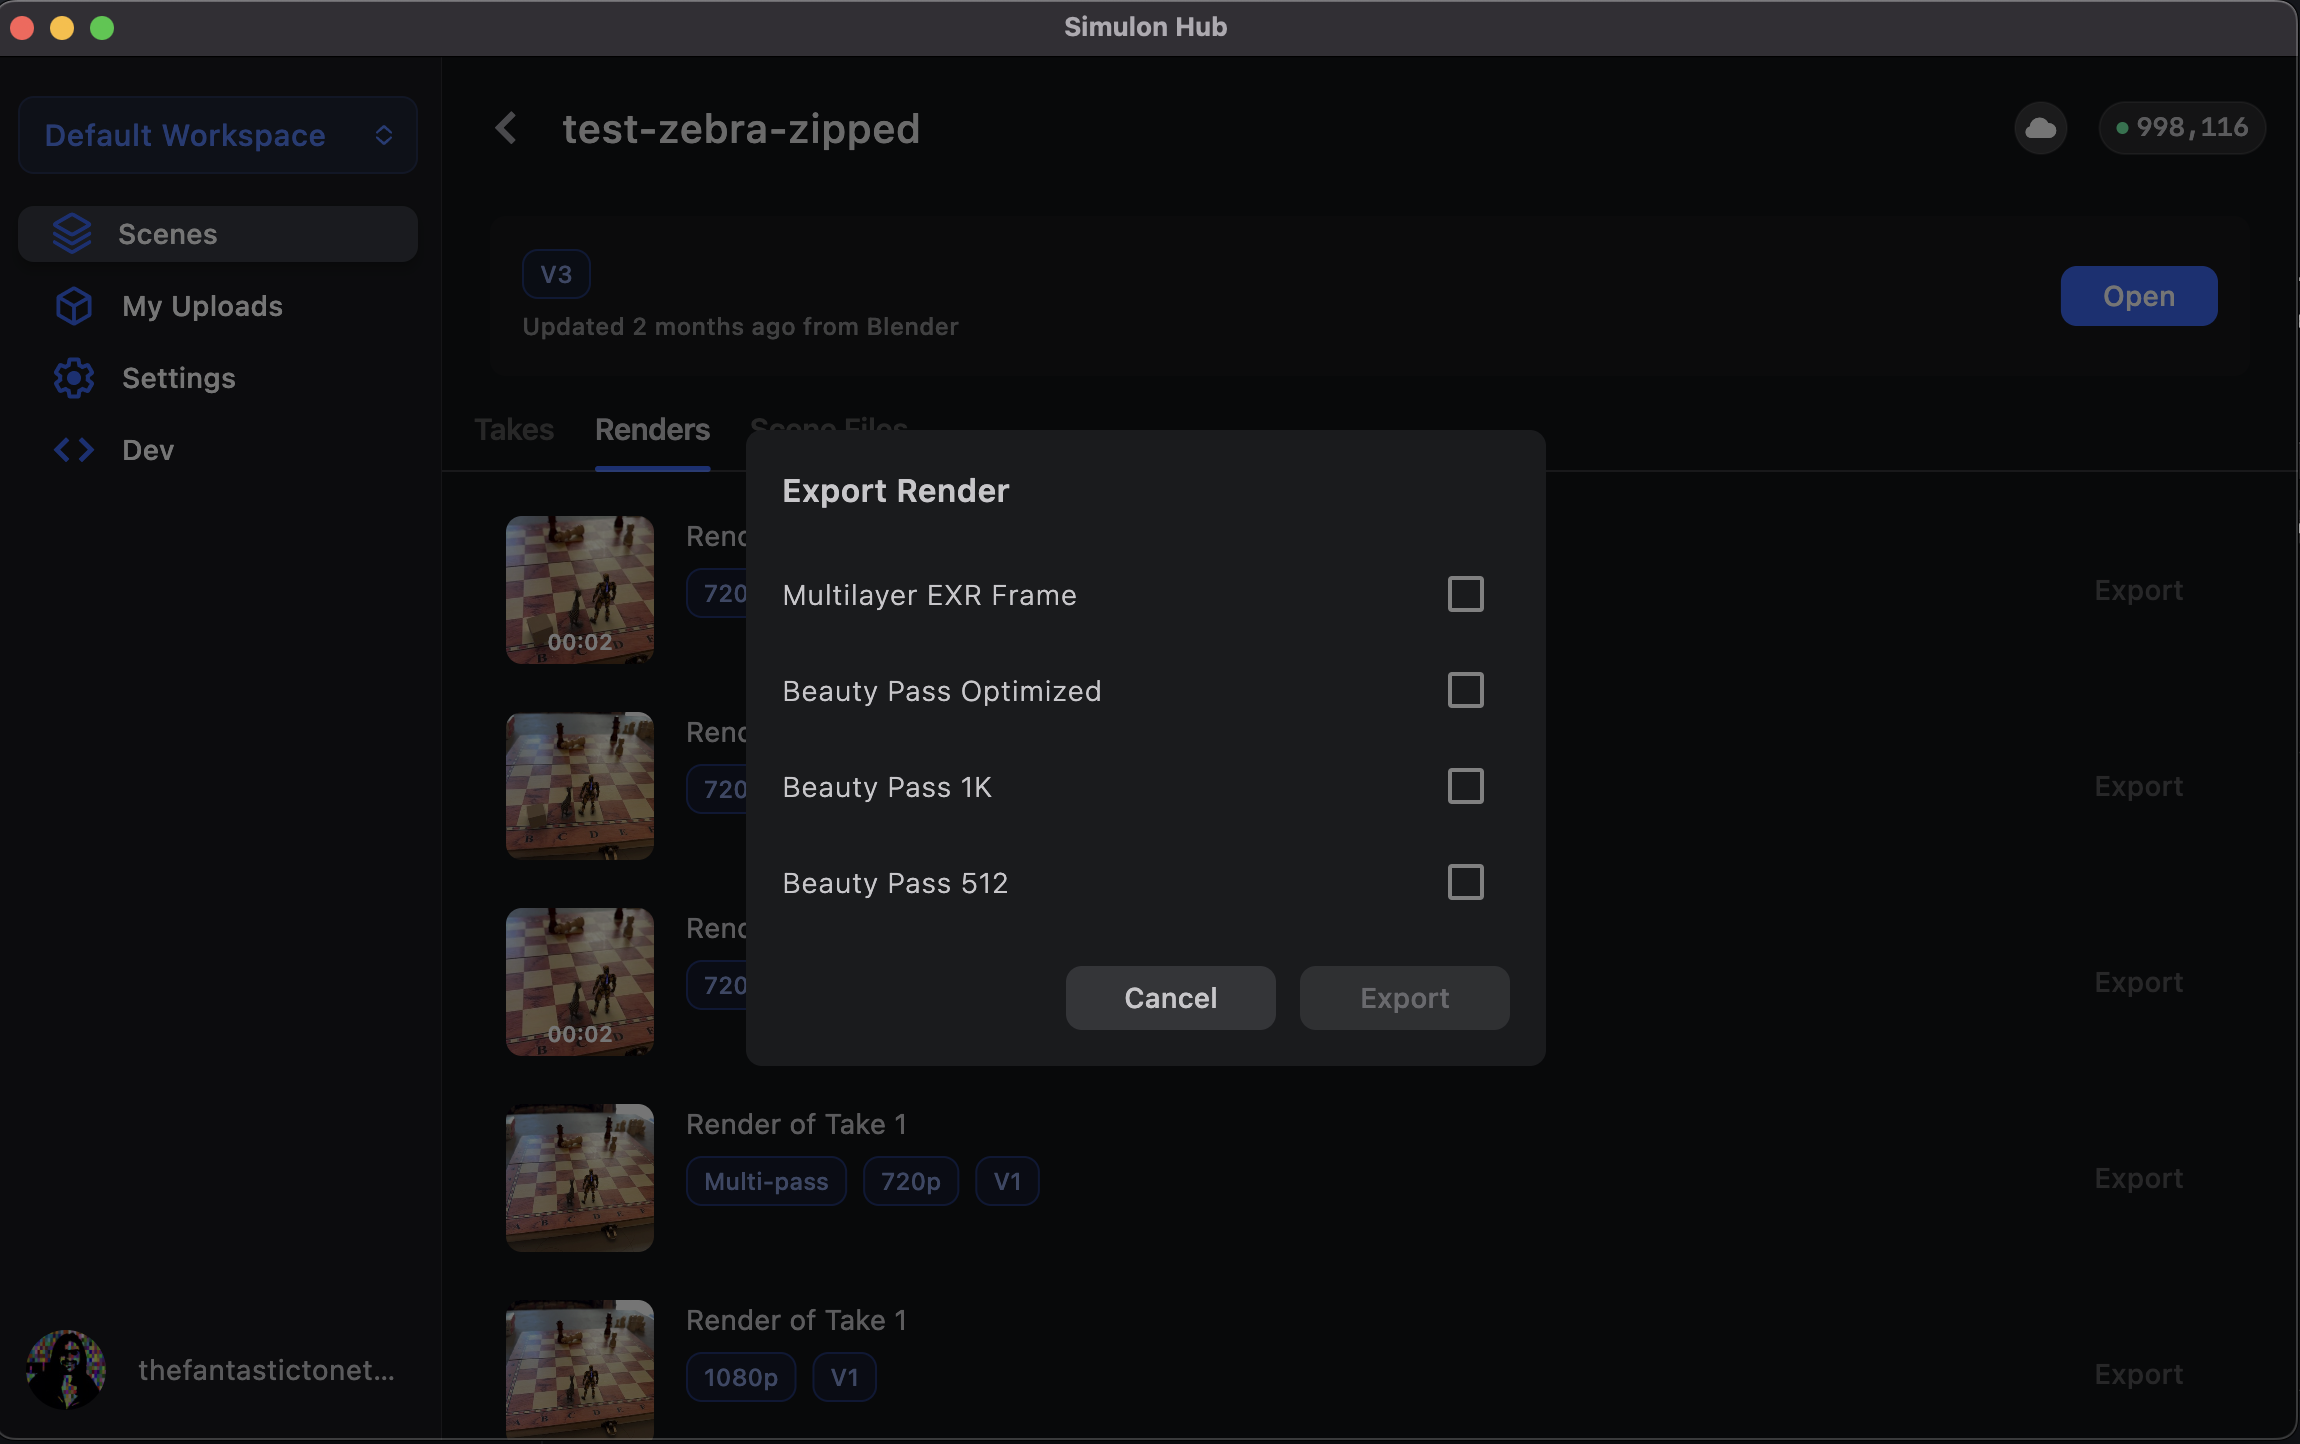
When you click export a pop up will show the available artifacts from the render that can be downloaded

<figure><img src="/files/PC8AZ9whLeJ0ZfiIBXJT" alt=""><figcaption></figcaption></figure>

## Multi-pass Renders

Multi-pass renders can be useful for some creators who want to incorporate a post render workflow to color grade or recomp other images using Compositing software like Nuke.

<figure><img src="/files/AX9pzFSwlXwwwPwjtvZa" alt=""><figcaption><p>Mult-pass render in Nuke showing Cryptomattes</p></figcaption></figure>

The following table shows the layers that are exported, and which mode they will be available in when you capture your take in iOS&#x20;

<table><thead><tr><th width="189">Render Pass</th><th width="194">Available</th><th>Description</th></tr></thead><tbody><tr><td>BeautyPass</td><td>All modes</td><td>Final composited render as created by Simulon</td></tr><tr><td>Backplate</td><td>All modes</td><td>The captured backplate</td></tr><tr><td>Camera Depth</td><td>DOF or Human Depth</td><td>The depth pass as generated by iOS LiDAR</td></tr><tr><td>Human Depth</td><td>Human depth</td><td>Human depth frame as retrieved by ARKit</td></tr><tr><td>Human Stencil</td><td>Human Occlusion + Human Depth</td><td>Human occlusion alpha mask as generated by Simulon</td></tr><tr><td>CG</td><td>All modes</td><td>The virtual camera render</td></tr><tr><td>CGDepth</td><td>All modes</td><td>The virtual depth pass of the virtual camera</td></tr><tr><td>CryptoMaterial</td><td>All modes</td><td>The CG layer individual material cryptomattes</td></tr><tr><td>CryptoObject</td><td>All modes</td><td>CG layer crypto object mask</td></tr><tr><td>DiffuseDirect</td><td>All modes</td><td>Diffuse lighting pass of the CG scene</td></tr><tr><td>DiffuseIndirect</td><td>All modes</td><td>Indirect diffuse lighting pass of the CG Scene</td></tr><tr><td>Emission</td><td>All modes</td><td>Emissive lighting pass of the CG Scene</td></tr><tr><td>GlossDirect</td><td>All modes</td><td>Gloss lighting pass of the CG Scene</td></tr><tr><td>GlossIndirect</td><td>All modes</td><td>Indirect gloss lighting of the CG Scene</td></tr><tr><td>ShadowAOCombined</td><td>All modes</td><td>Shadow and ambient occlusion pass of the CG Scene</td></tr><tr><td>TransmissionDirect</td><td>All modes</td><td>Transmission lighting pass of the CG Scene</td></tr><tr><td>TransmissionIndirect</td><td>All modes</td><td>Indirect transmission pass of the CG Scene</td></tr></tbody></table>


# Scenes

The scenes tab allows you to open a blender editable scene and download built scene artifacts such as the .hdr used for lighting and the environment mesh you captured in your iOS session.

Locally editable scenes are ones that comprise of  royalty free assets from our library, or assets you've uploaded yourself.  Scenes that can be edited are displayed with "Hub Editing" field set to active. Scenes that can't be edited will still be shown as you are still able to download render and take data associated with the scene.&#x20;

<figure><img src="/files/28G5BeOMjGG2HK52XU0B" alt="" width="563"><figcaption></figcaption></figure>

Before accessing your scene on desktop you will need to first build the scene.

<figure><img src="/files/HhyzFFJVb7iwNRT27iYg" alt=""><figcaption></figcaption></figure>

Once built you will be able to open the tab and download the scene.

<figure><img src="/files/2nrGNmEVxMoXQ3U5S9VY" alt=""><figcaption></figcaption></figure>

{% hint style="info" %}
**Note**

You are able to view or customise this your default scene download folder in "Settings > Default Scene Location"
{% endhint %}

From here you can either open the scene directly in Blender (if you have installed the Simulon Link plugin) or open the folder that contains all the scene related assets.


# Blender Integration

Thanks to Blender's plugin support, we have created plugins to make it easy to edit and change your creations locally as well as upload custom assets with ease.

In order to give creators complete freedom for asset and scene creation, we have developed a close integration with Blender. This comes in the form of two plugins which are installed from within Blender:

1. [**Simulon Link**](/hub/simulon-hub/blender-integration/simulon-link)
2. [**Simulon Asset Preparation**](/hub/simulon-hub/blender-integration/custom-asset-preparation)

Currently **we only support Blender 4.4.3 and above**, so ensure you have downloaded this before installing these plugins, otherwise some plugins may not be available.


# Blender Plugin Installation

How to install Blender plugins for Simulon

In order to give creators complete freedom for asset and scene creation, we have developed a close integration with Blender. This comes in the form of two plugins which are installed from within Blender:

1. [**Simulon Link**](/hub/simulon-hub/blender-integration/simulon-link)
2. [**Simulon Asset Preparation**](/hub/simulon-hub/blender-integration/custom-asset-preparation)

{% hint style="warning" %}
Currently **we only support Blender 4.4.3**, so ensure you have downloaded this before installing these plugins, otherwise some plugins may not be available.
{% endhint %}

### Installation

To install both plugins, follow these steps:

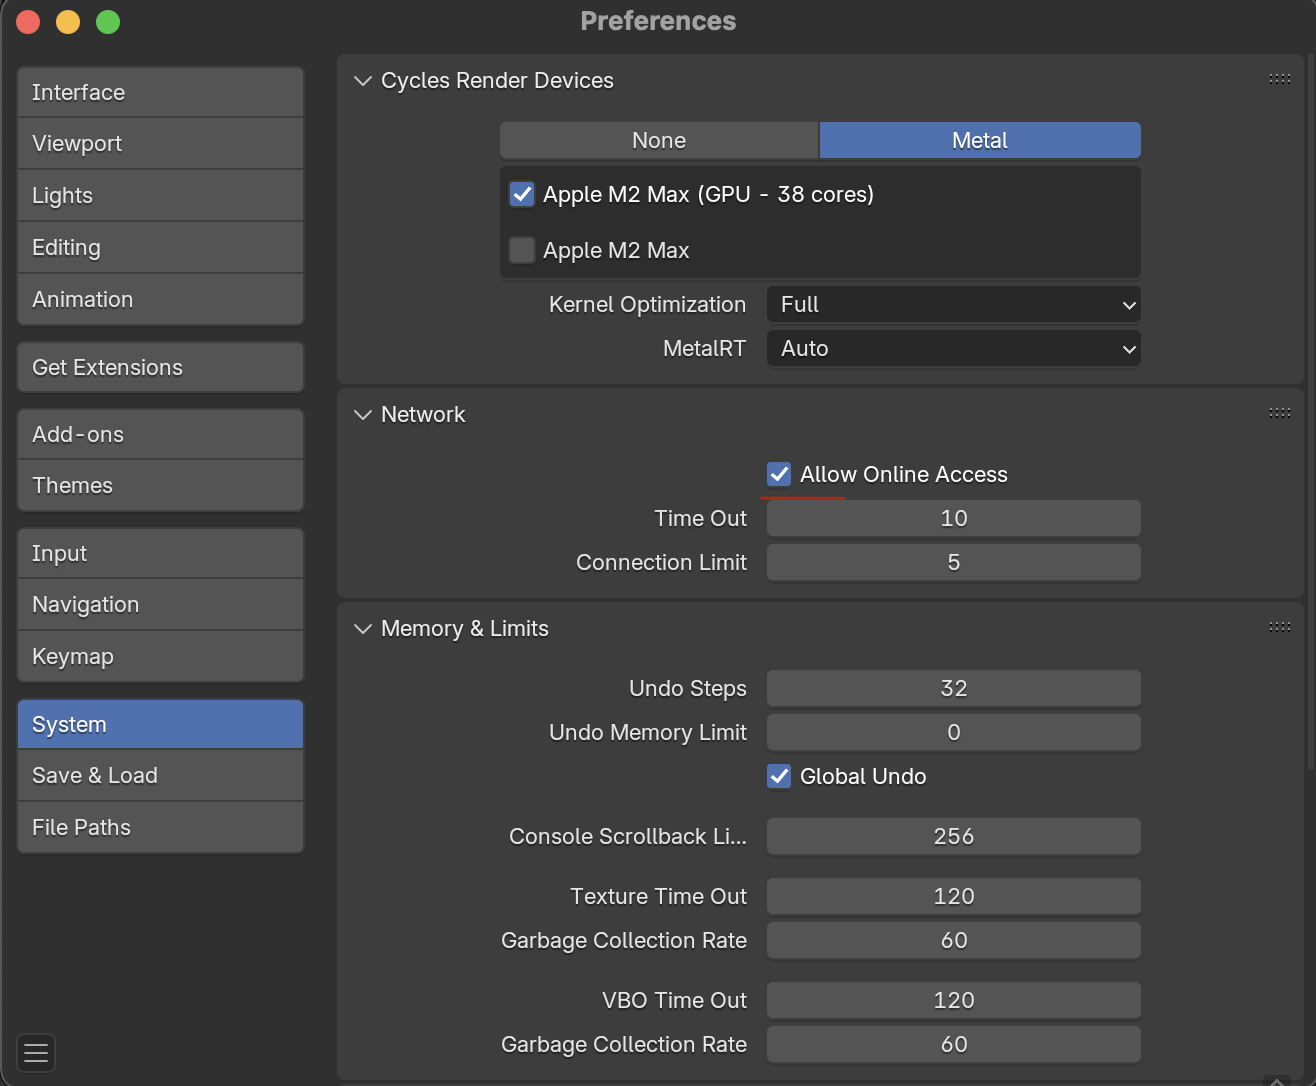
1. Open Blender and navigate to Edit > Preferences > System > Network > Allow Online Access and ensure this active.

<figure><img src="/files/4VkM5f1BH47wEFHyoaAI" alt="" width="375"><figcaption></figcaption></figure>

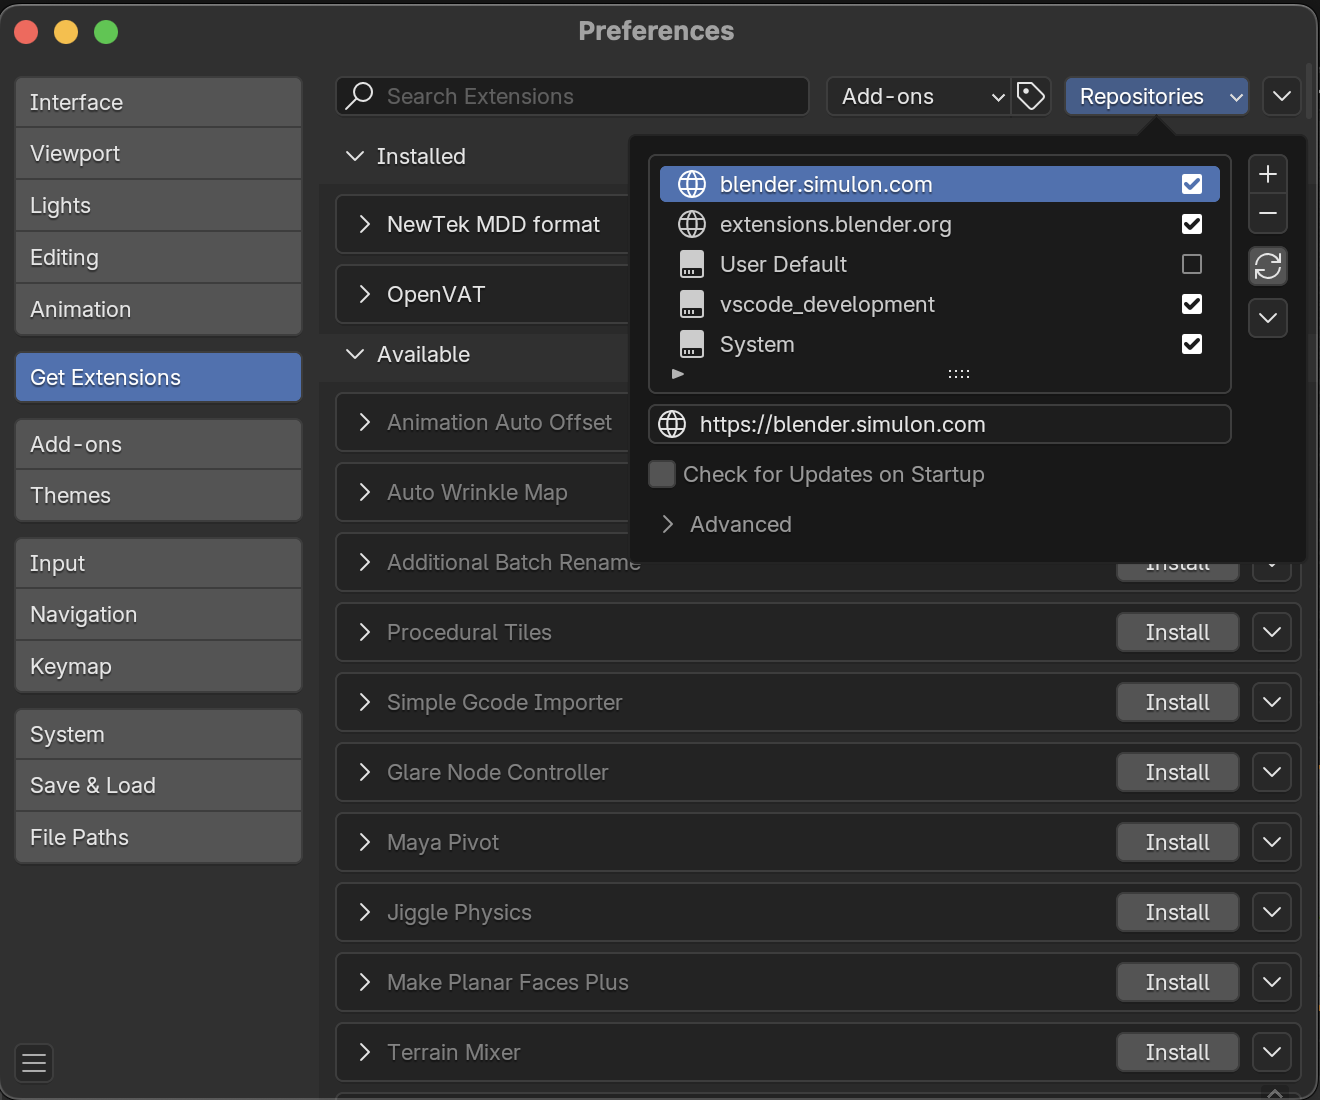
2. Navigate to Edit > Preferences > Get Extensions > Repositories > "+" and add the [https://blender.simulon.com](https://blender.simulon.com/) repository

<figure><img src="/files/9QZcaxkoTL3UtTx8tYdF" alt="" width="375"><figcaption></figcaption></figure>

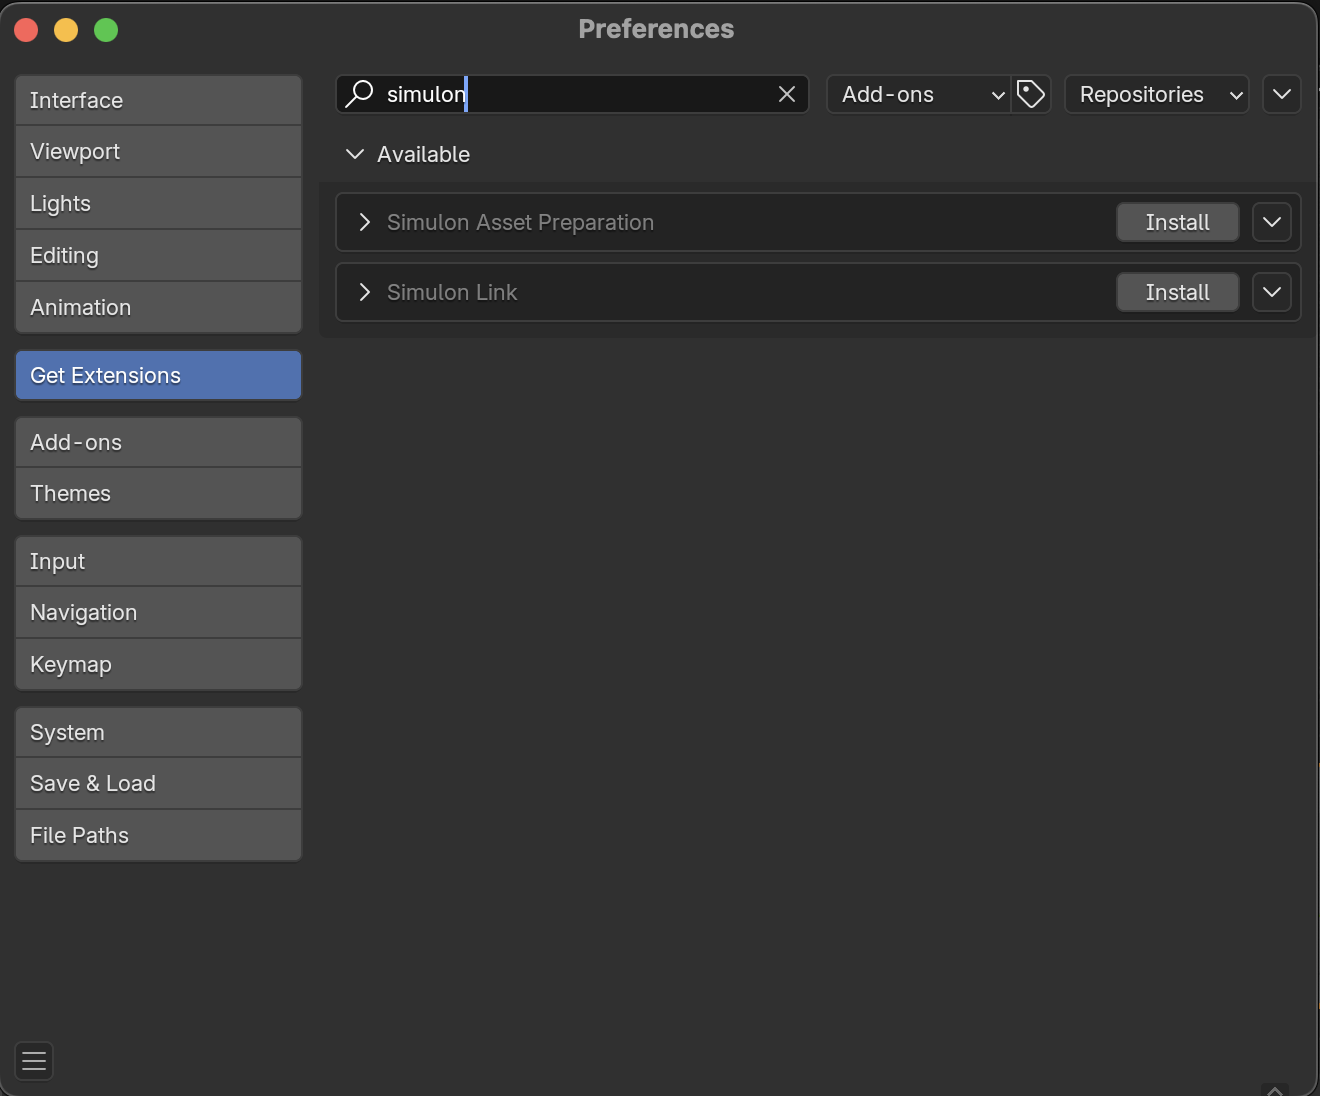
3. Search for "Simulon" in the search bar and you'll find both plugins available for "Install"

<figure><img src="/files/5AZKwxCFgb8ADPui18kN" alt="" width="375"><figcaption></figcaption></figure>

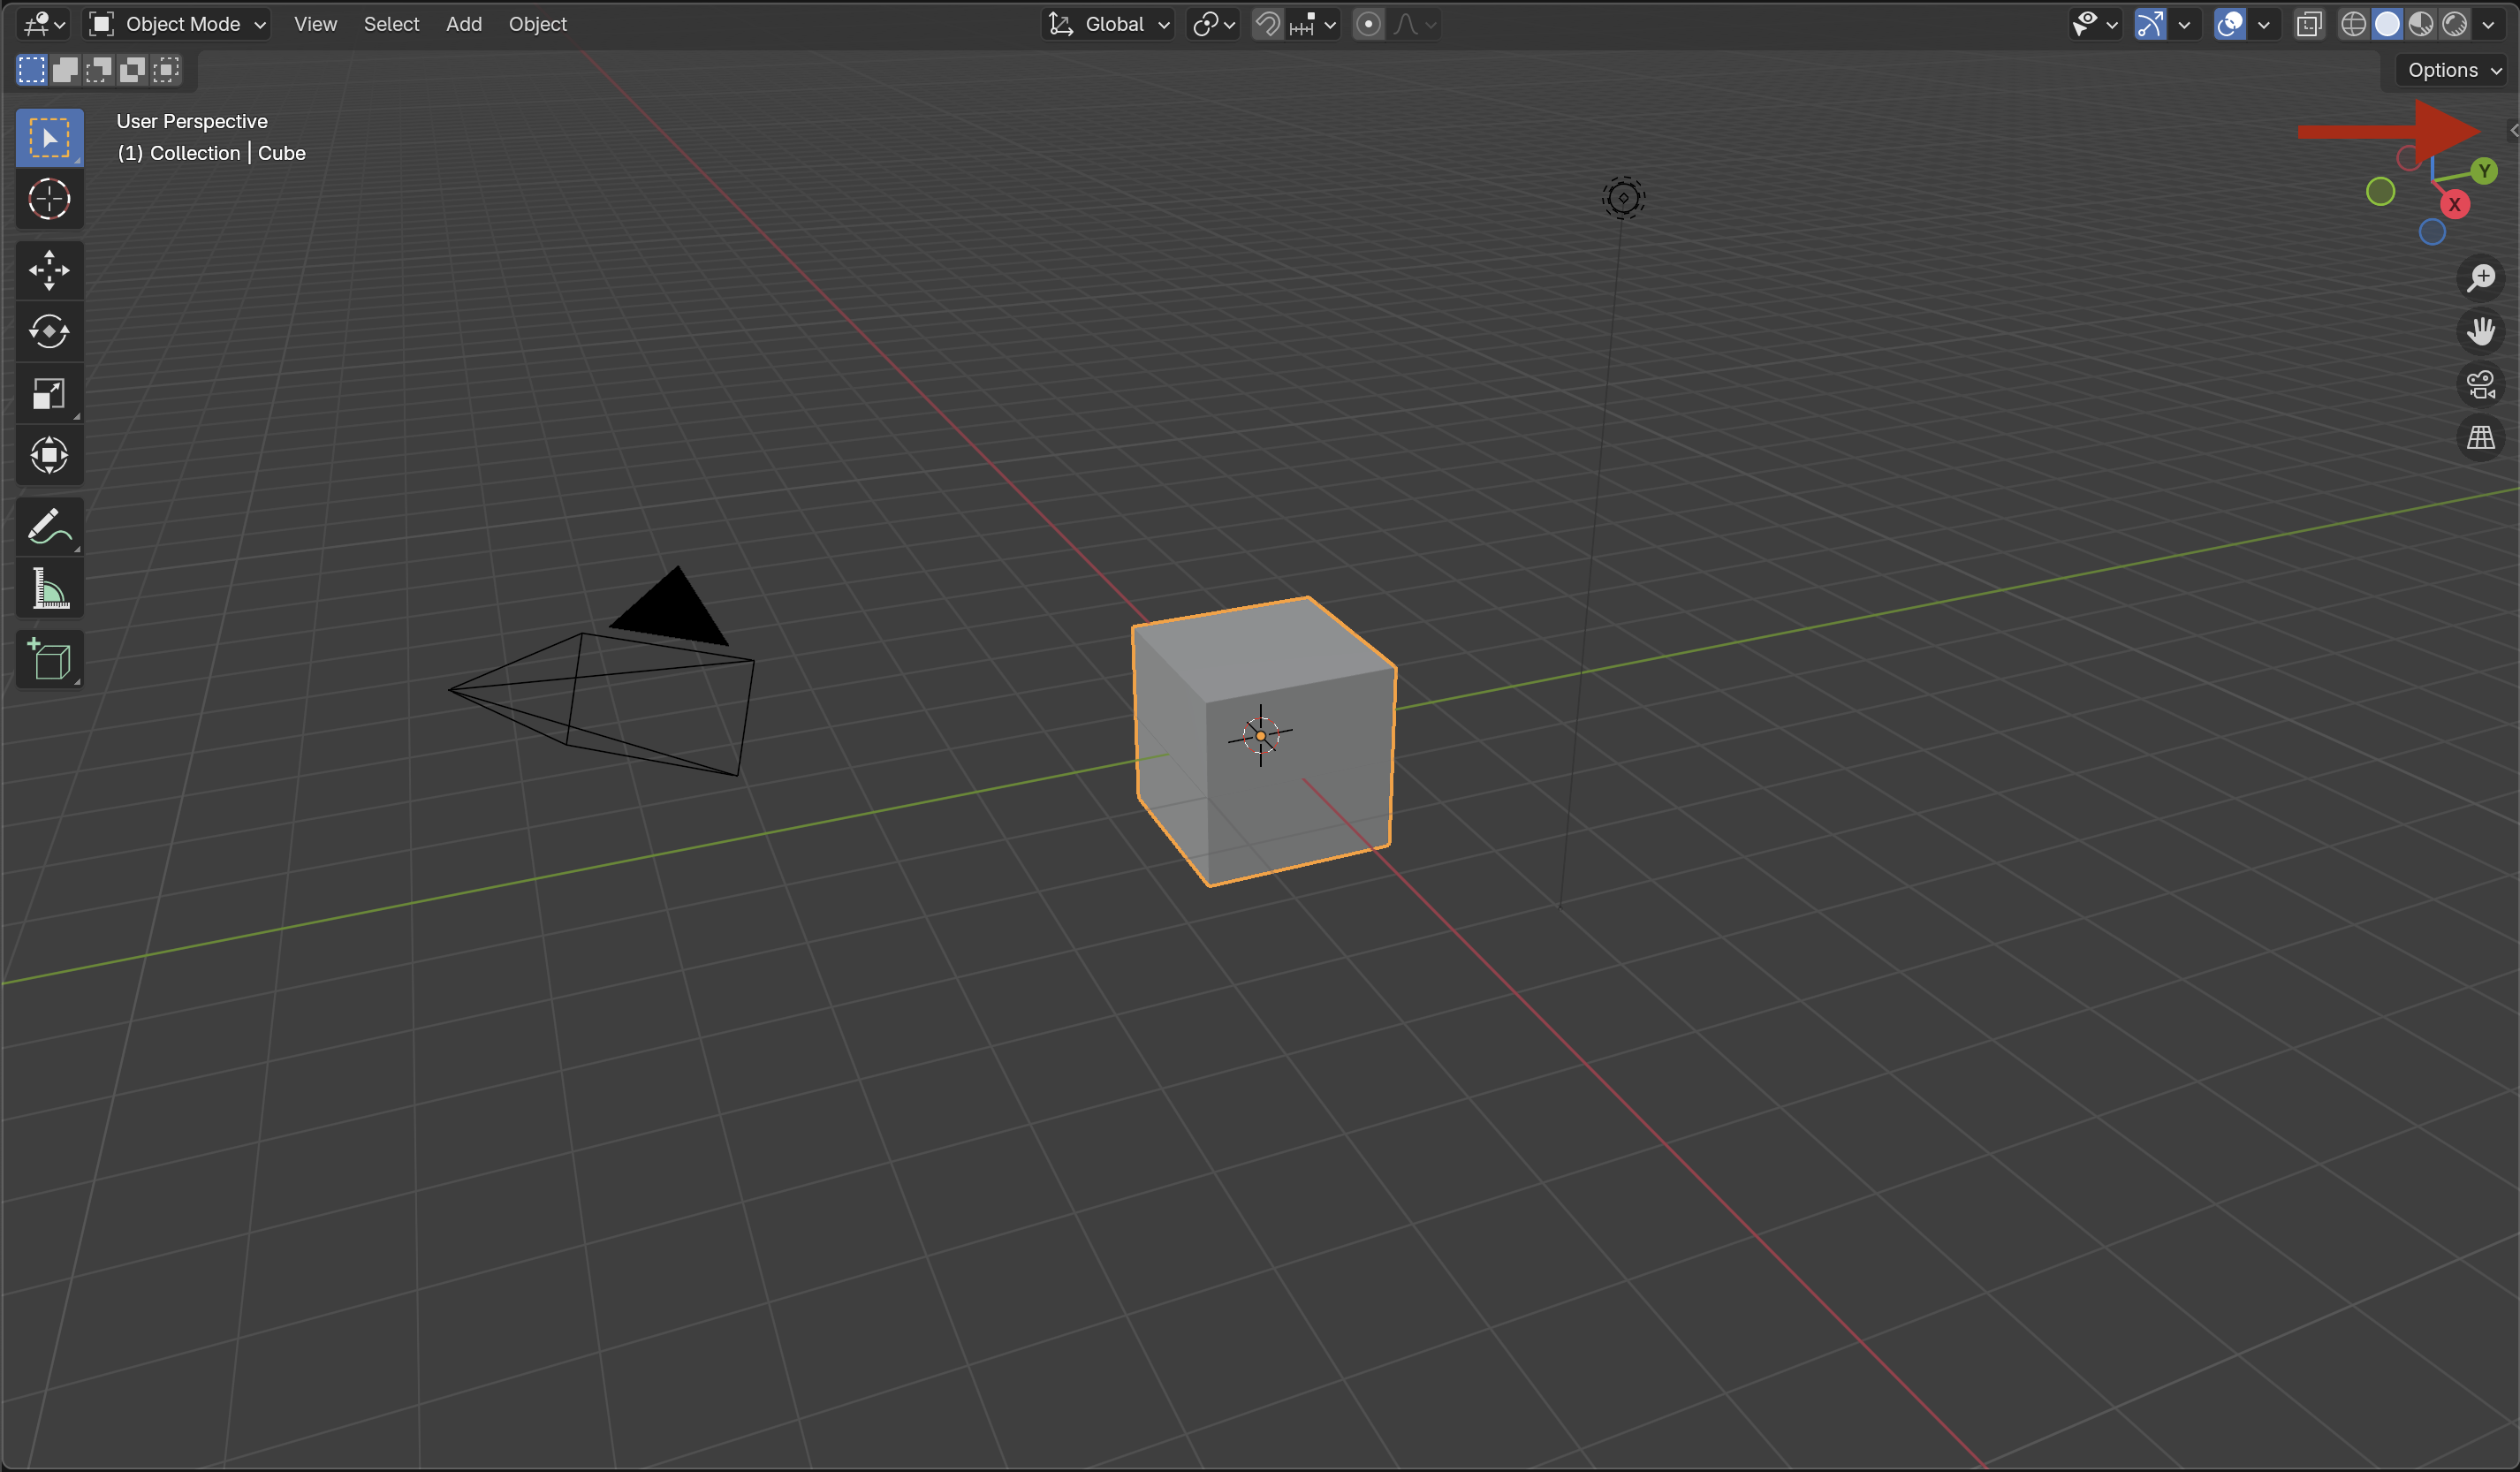
4. Once installed you'll be able to find the plugins in the 3D viewport sidepanel after clicking the "<" icon.

<div align="left"><figure><img src="/files/q4oYow33KezKRS9SQBfc" alt="" width="375"><figcaption></figcaption></figure> <figure><img src="/files/dcqCK16E5k2Nt7wZWEXa" alt="" width="375"><figcaption></figcaption></figure></div>

{% hint style="warning" %}
**Note**

The Simulon Link plugin will only be displayed when opening Simulon created scenes. These can be opened from within Simulon Hub
{% endhint %}


# Simulon Link

The Simulon Link plugin is a plugin in Blender that connects you to our cloud. Allowing scene edits to your already captured takes, or the ability to edit and render your scene locally.

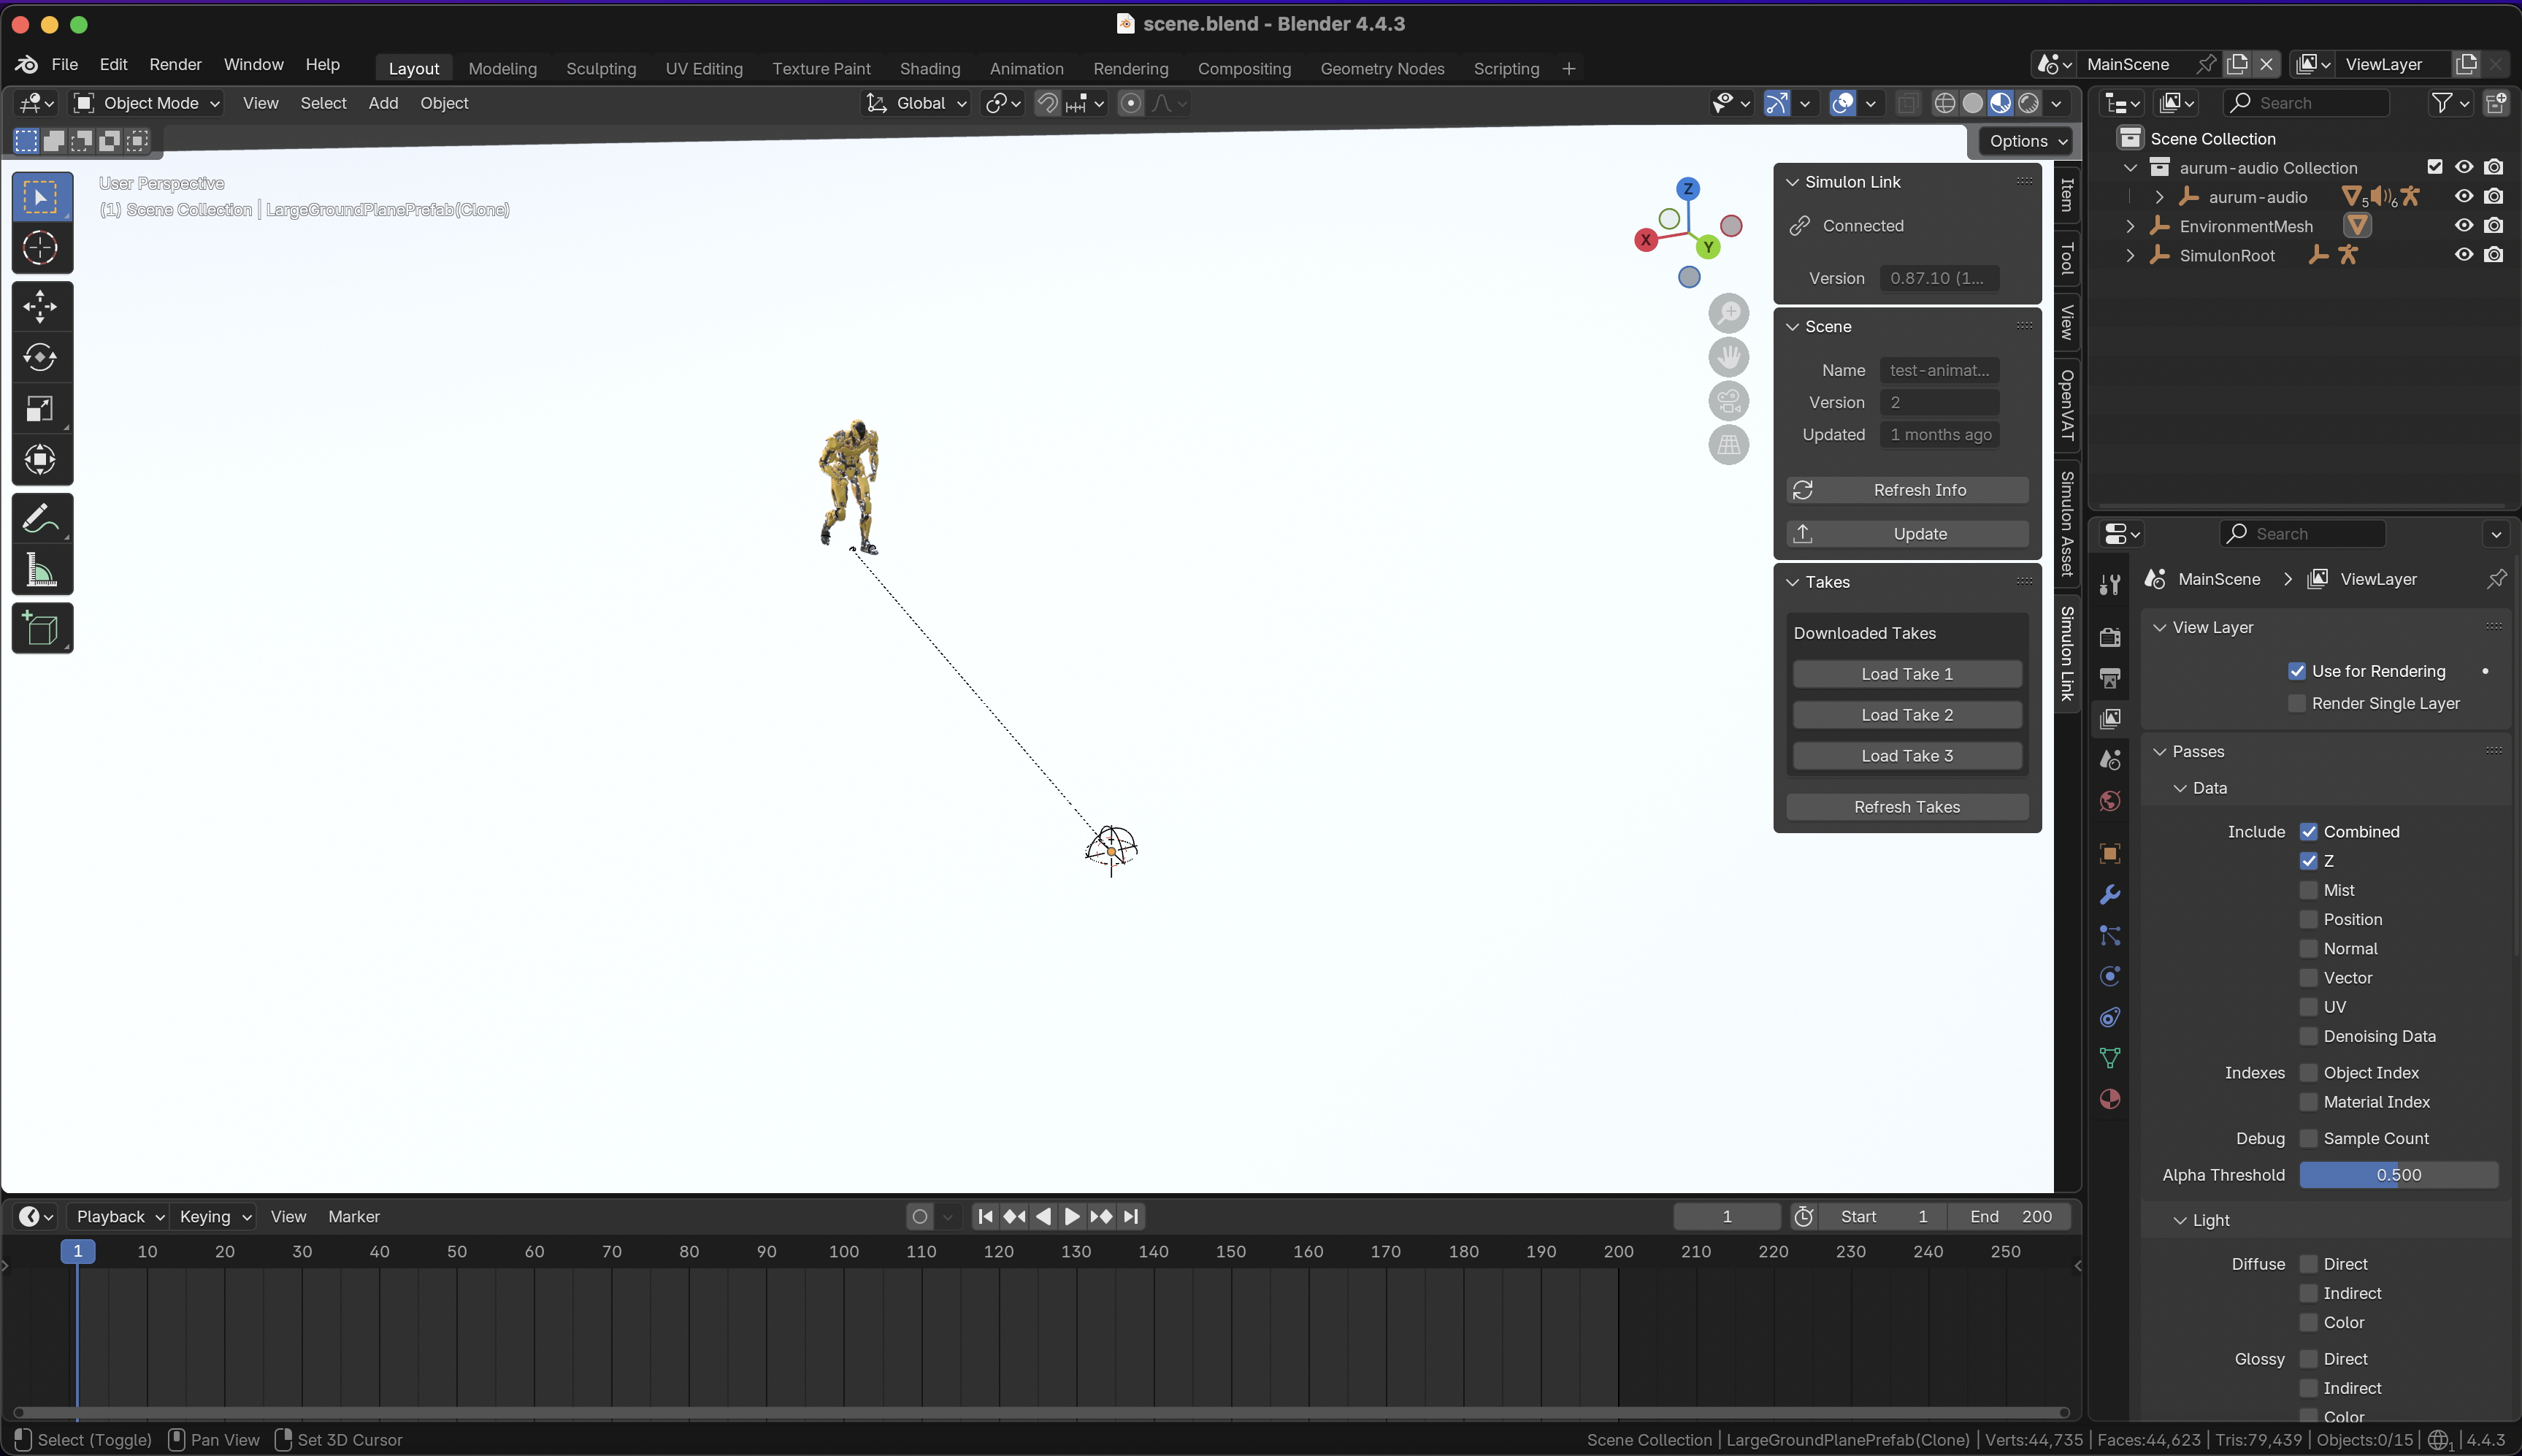
After installing the Simulon Link plugin and opening your locally editable scene you will be able to access the Simulon Link tab.&#x20;

{% hint style="info" %}
**Note**

You are able to open your scene's .blend from Hub or Blender directly. A connection between Blender and Hub will established as long as Hub is open.
{% endhint %}

After Blender is opened you'll be shown your scene geometry and assets as was created in the app. By default no camera or light data is instantiated after opening.&#x20;

<figure><img src="/files/OAeOeB2bgO6EEuTwXZoo" alt=""><figcaption></figcaption></figure>

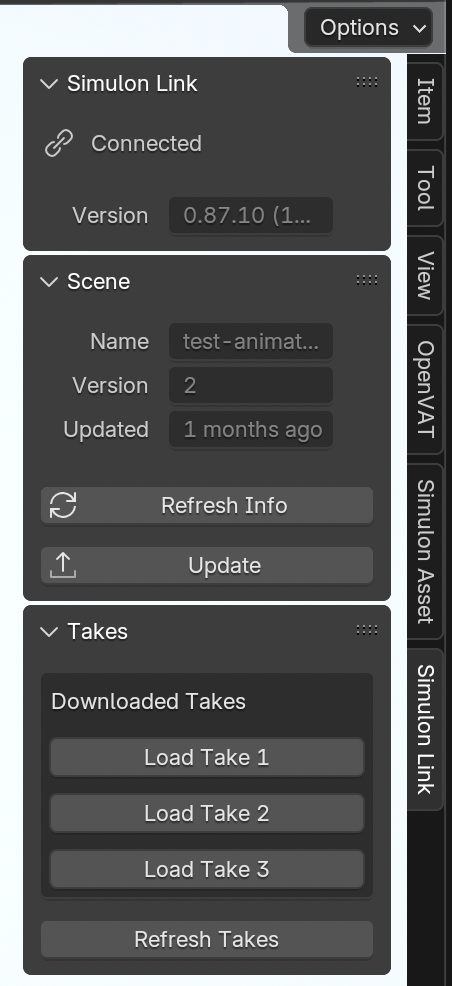
You are able to then load takes captured by the app using the "Load Take" buttons.&#x20;

<figure><img src="/files/8hncMa3KmbnFGrIkOXco" alt="" width="226"><figcaption></figcaption></figure>

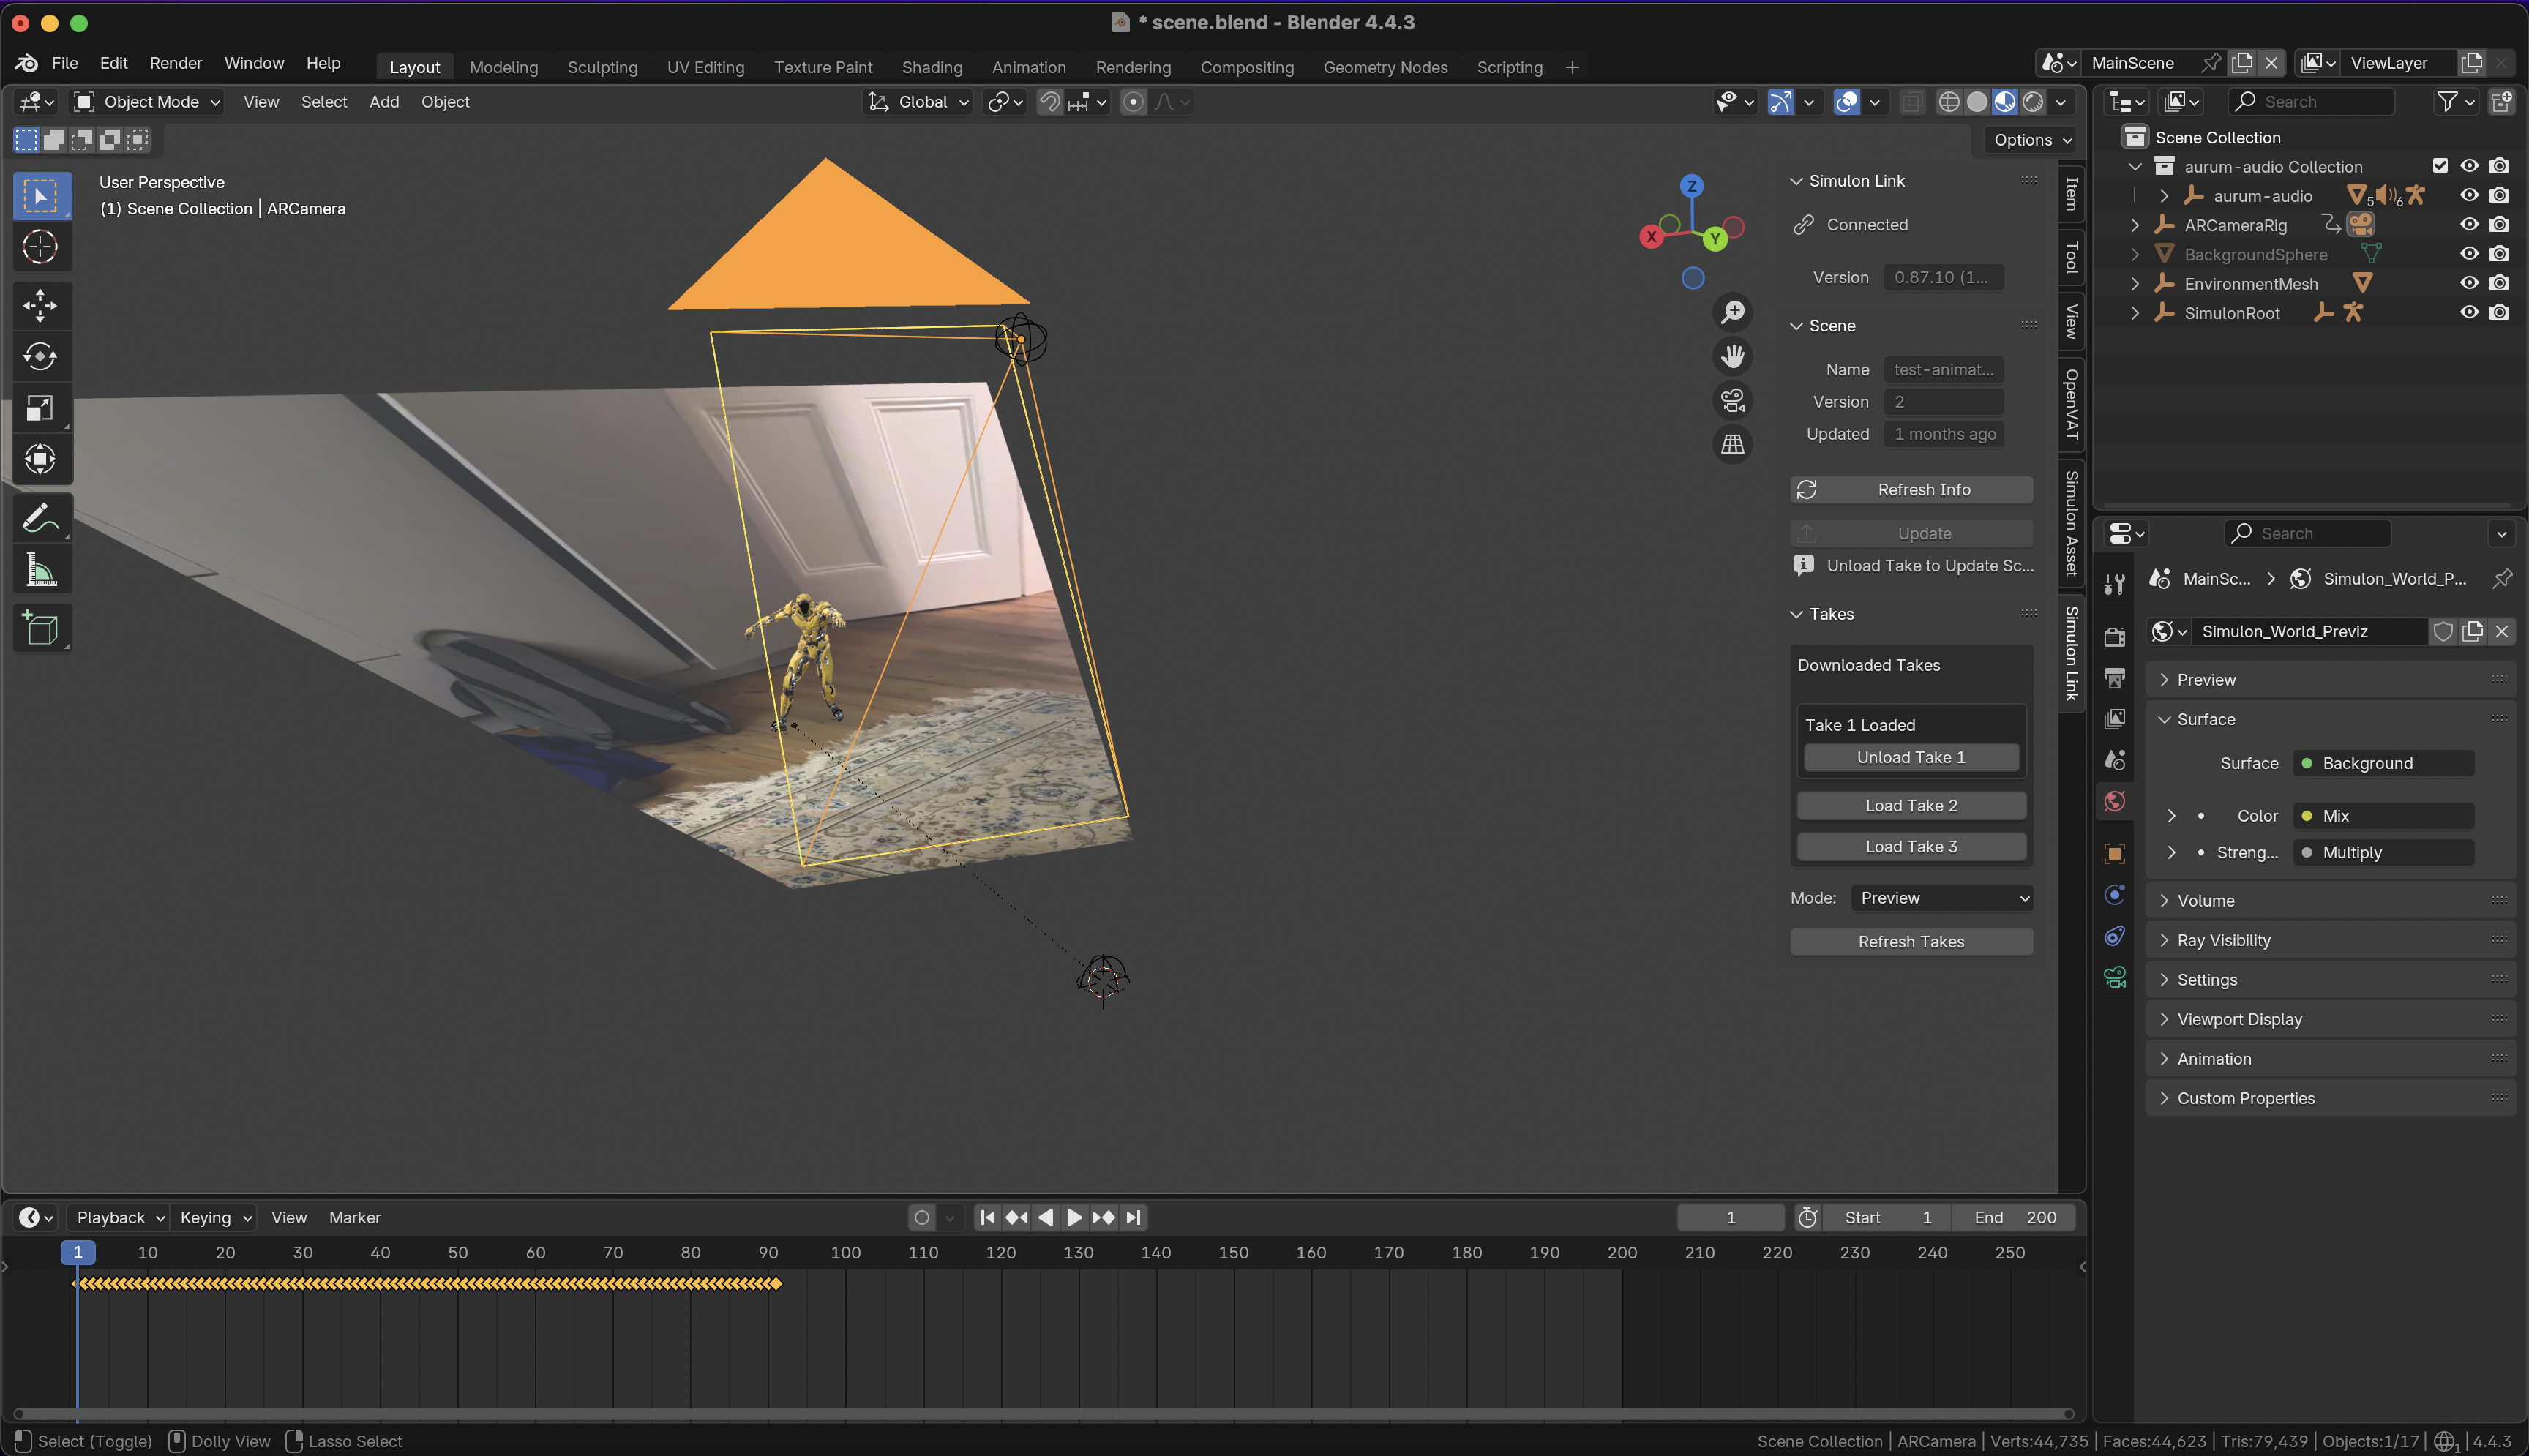
When loading a take lighting, camera data and the selected animation for your asset during take capture will be loaded.&#x20;

<figure><img src="/files/B9yFJDyVpYv5a3d3KBEg" alt=""><figcaption></figcaption></figure>

## Syncing Edits from Blender to Simulon

Simulon allows for any edits done to your scene in Blender to be synchronized back up to our cloud. This is a powerful feature which allows creators to make changes to the takes they have already created in post. This allows you to harness all the scene edit features of Blender in your renders. You can add particle systems, fog, clean up environment scan geometry and much more.&#x20;

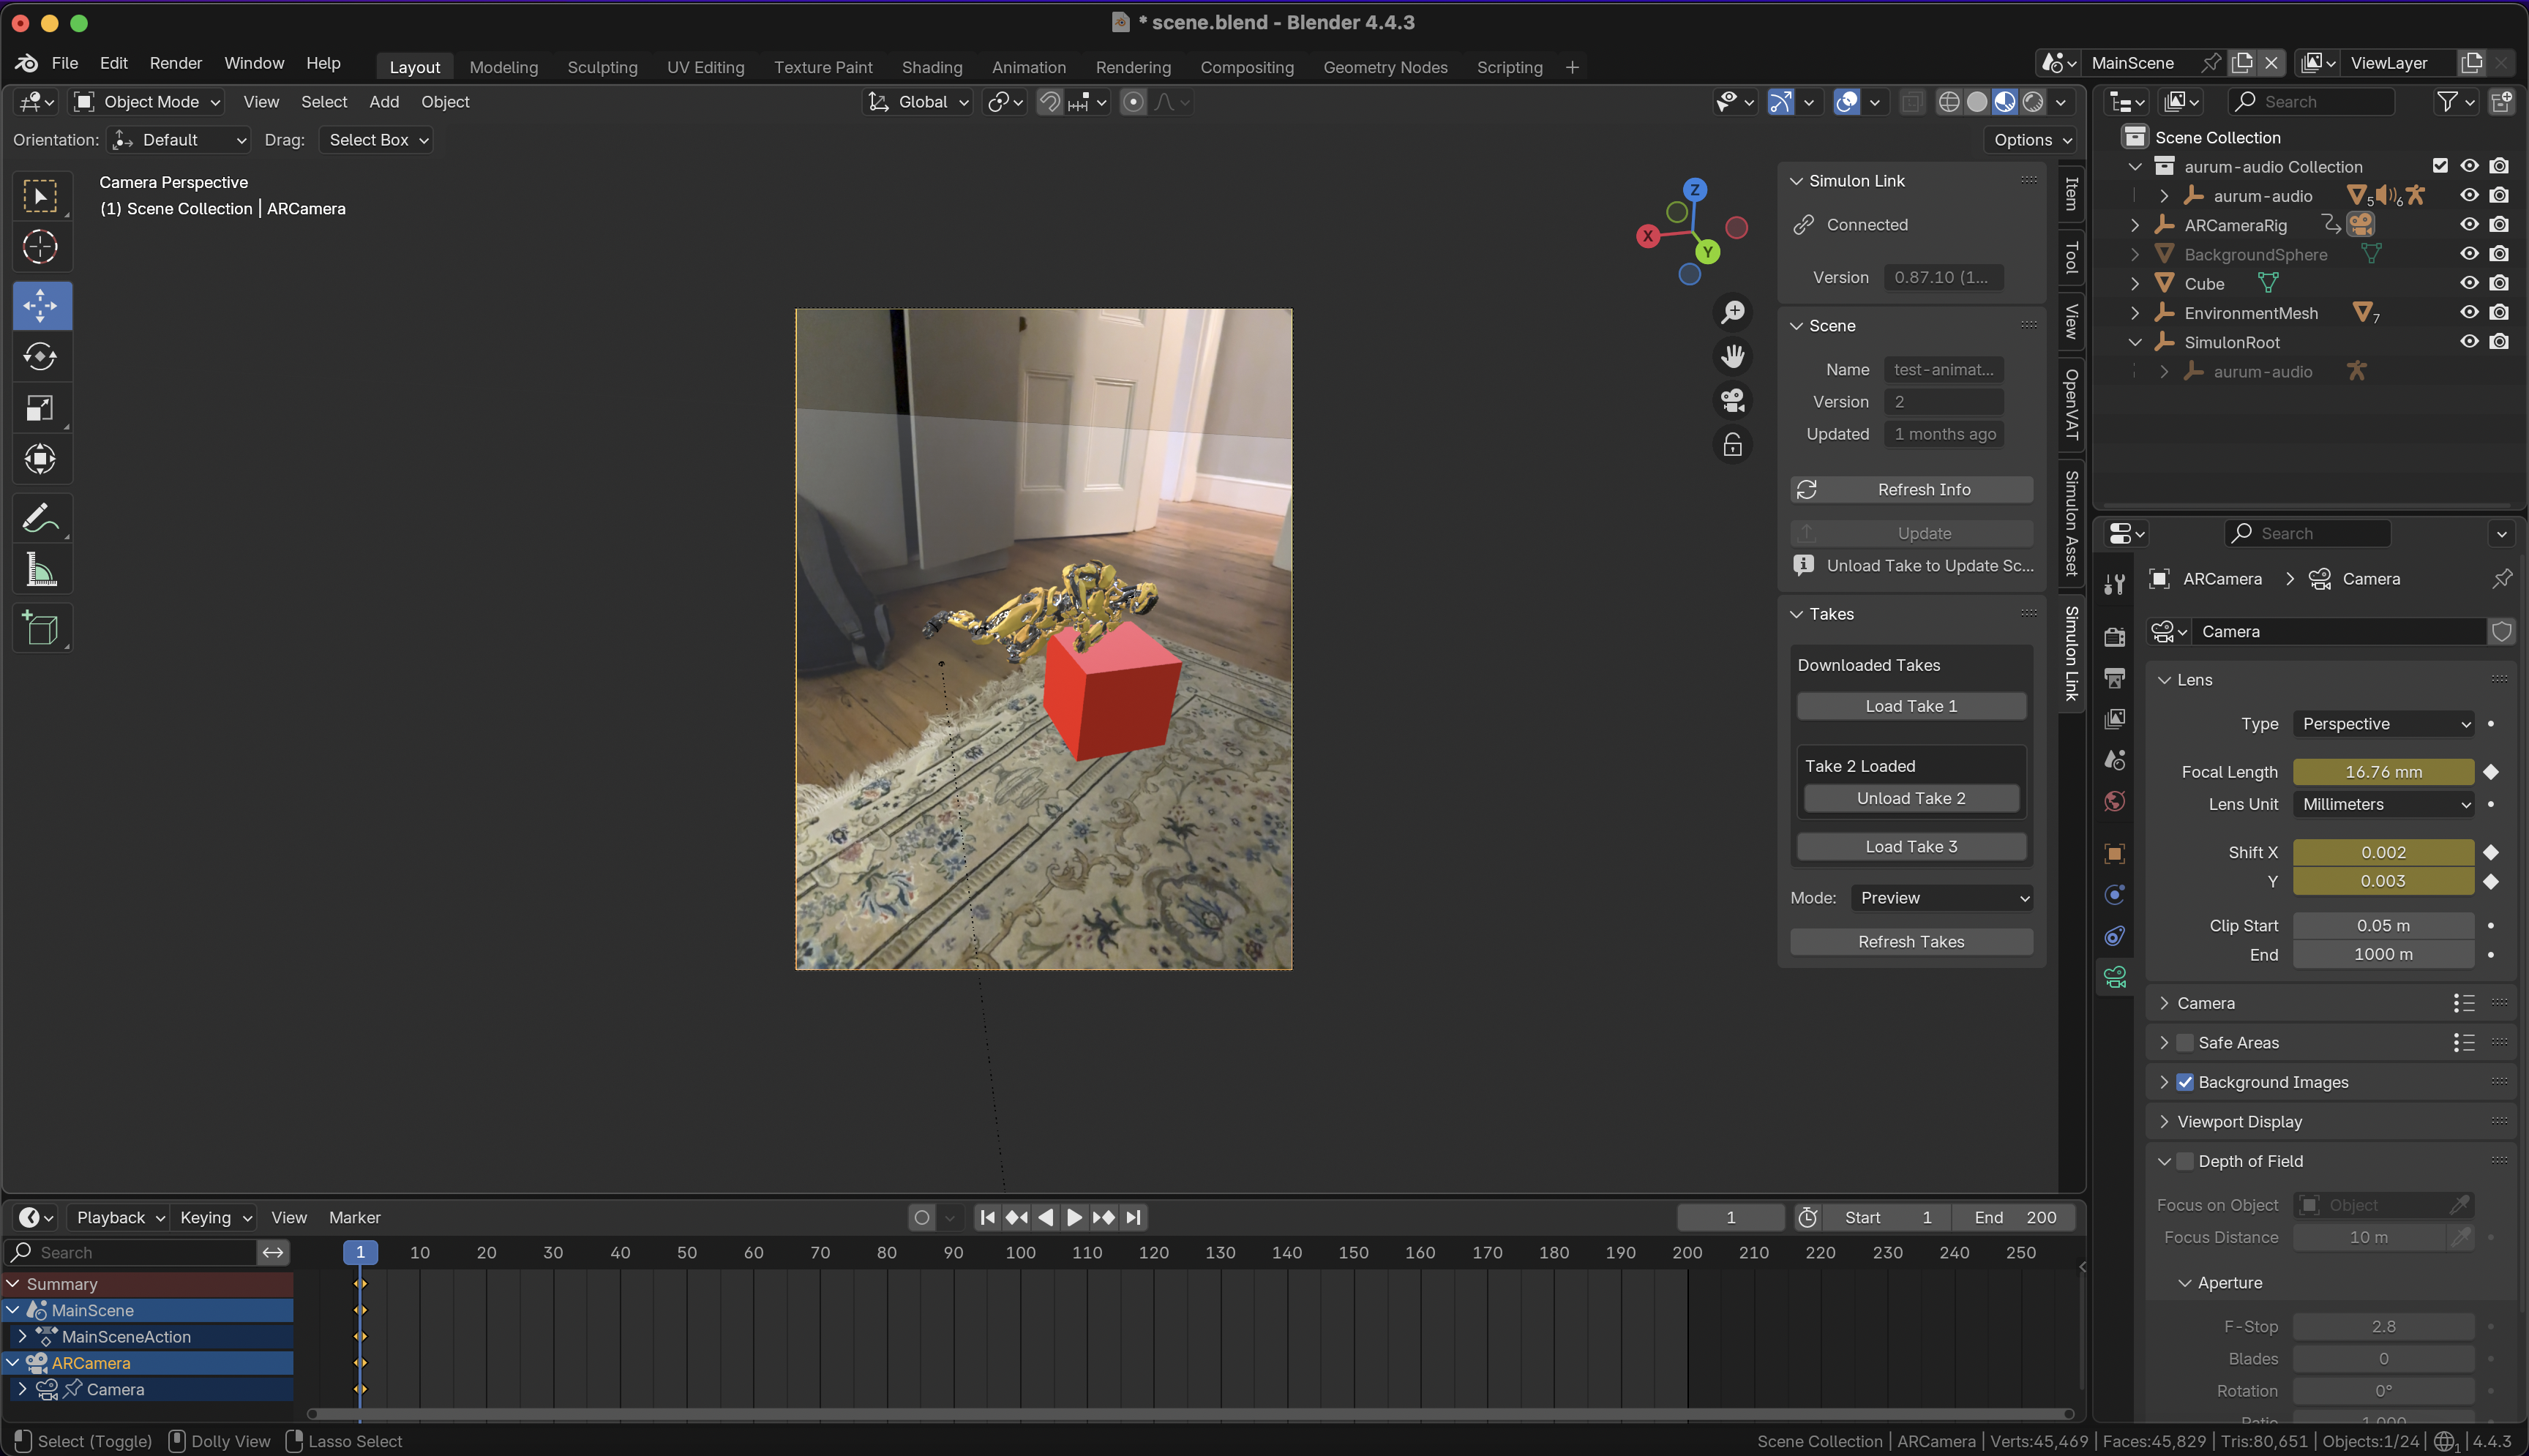
<figure><img src="/files/CNivE85nvU53byiCVveD" alt=""><figcaption><p>Adding a red cube to Blender Scene</p></figcaption></figure>

After you've made changes to your scene, you can hit the "Update" which will handle the process of zipping up your files, creating a delta file and uploading this to Simulon. Status updates can be found in both Hub and the Link plugin. &#x20;

<figure><img src="/files/Tl27LHfPmDfVvGr3ZJvQ" alt="" width="234"><figcaption></figcaption></figure>

<figure><img src="/files/Lpp78FJ4JCzzDf05wwUP" alt=""><figcaption></figcaption></figure>

One the update has been processed, you will see the scene version number increment and a message saying when it was updated and when.&#x20;

<figure><img src="/files/SMBMR2zrLbenpD0XZpqV" alt=""><figcaption></figcaption></figure>

&#x20;You can then simply rerender the take you'd like and it will render with your scene changes.

<figure><img src="/files/4XJbem0RW26mCZDImWn0" alt=""><figcaption></figcaption></figure>


# Custom Asset Preparation

The Custom Asset Preparation plugin makes it easy to prepare Blender files for upload.

Simulon supports .glb, .usdz and native .blend assets. In most cases, you will get the most control and expected upload results when using Blender to prepare your assets. As such, we recommend using Blender where possible to prep your assets. The Simulon Asset Preparation plugin simplifies certain processes when working with Blender to avoid common mistakes when creating assets for Simulon through Blender.

<figure><img src="/files/S4vuT7WEQJ1u3f2YH1DW" alt=""><figcaption></figcaption></figure>

{% hint style="info" %}
**Note**

The only limit for what you can put into a .blend file is the poly count which is currently fixed to 2 million triangles.
{% endhint %}

More information regarding material setup and animation is covered in the [Asset Preparation](/hub/simulon-hub/blender-integration/custom-asset-preparation/asset-preparation) and [Animation](/hub/simulon-hub/blender-integration/custom-asset-preparation/adding-animation) sections.&#x20;


# Cloud Build Pipeline

Your asset is processed in the cloud to create proxy variants for mobile while keeping your original upload intact.

When you upload an asset to Simulon, our backend does two important things:&#x20;

1. It generates a **proxy** version of your asset which is optimised for running on mobile.
2. It prepares your original asset for cloud rendering.&#x20;

### Auto-Generated Proxy

Simulon's proxy generation process two major things:

1. It scales all your textures to a size suitable for running on mobile.
2. It decimates your asset to reduce the amount of polygons that are needed to be rendered on mobile.

In most cases the auto-proxy generation should give satisfactory results for mobile, however in some cases a custom proxy may want to be used to apply more bespoke optimisation to your asset.

### Custom Proxies

The Blender asset prep workflow gives you the ability to decide what is included and not included in the proxy version that is used on mobile. It also allows you to create bespoke proxy assets if the auto-decimation is not as accurate.

{% hint style="warning" %}
**Note**

Simulon will still apply decimation to your proxy assets if over 150000 triangles to ensure a smooth mobile experience when using the asset.
{% endhint %}

In the Blender outliner when an object or collection is "Disabled in Viewport" (the pc monitor icon), it will be **omitted** from the proxy. If an object or collection is "Disabled in Render" (the camera icon) it will be **omitted** from the final render.

<figure><img src="/files/MpASZjiL9ORTsjwO4QH6" alt=""><figcaption></figcaption></figure>

This gives creator control over what they see in mobile vs what they see in the final render. This can be especially useful for things such as complex simulations or animations that don't need to be rendered on mobile for you to capture the take correctly.&#x20;


# Asset Preparation

How to prepare your 3D model for uploading to Simulon.

Simulon currently supports three formats: .glb, .usdz and native .blend.

The following steps are required to have your 3D asset function correctly;

1. Ground Contact
2. Origin
3. Scale
4. Backface Culling
5. Single Image UV's

For this tutorial we will use this awesome robot model by [Uliszs.3d](https://sketchfab.com/uliszs.3d)

{% embed url="<https://skfb.ly/oswBq>" %}

## 1. Ground Contact

Ensure your asset correctly touches the ground, as this determines its spawn position in Simulon relative to the real-world surface.&#x20;

If you are in Blender, use the X-axis line as your ground/surface reference. In orthographic view, position the base of your mesh directly over the X-axis line.

<figure><img src="/files/VJES632BrGFhciSnxKwQ" alt=""><figcaption><p><em>Mesh is grounded by having the lowest point of mesh adjacently above the X-axis line.</em></p></figcaption></figure>

## 2. Origin

The asset should be positioned and centered at the world origin. In Blender, this is where the x (red) and y (green) axis lines intersect.

<figure><img src="/files/kewbRdNDtNQf2NbshOXo" alt=""><figcaption><p><em>Origin is set at the default 3D cursor location (where all three axis’ meet).</em></p></figcaption></figure>

If the 3D cursor is set to its default location, you can set the origin of the asset to 3D cursor in Object Mode by using Object > Set Origin > Origin to 3D Cursor.

<figure><img src="/files/xdwGBgDMnCj1syq7N0SM" alt=""><figcaption><p><em>Set Origin to 3D Cursor can be found in the Object Menu of Object Mode.</em></p></figcaption></figure>

{% hint style="info" %}
**Tip**

If the 3D Cursor is not in it’s default position, you can reset it by using the Shift+C shortcut.
{% endhint %}

## 3. Scale

Simulon’s scale is based on real-world values. Using the Measure tool, make sure your asset has the correct real-world scale.

<figure><img src="/files/VWfi2MT6WLBA1xDD1XY1" alt=""><figcaption><p><em>The height of the asset is measured using the Measure tool, from the base to the top of the asset.</em></p></figcaption></figure>

In Simulon, assets are initially auto-scaled based on screenspace and distance to prevent unusable sizing from the creator's perspective. To see the asset at its original size, double-tap it or select "Scale 1:1" when the asset is highlighted.

## 4. Backface Culling

Some meshes have exposed backfaces that are not closed off. With backface culling enabled, these backfaces are hidden, which is not advisable. Disable backface culling to ensure faces are double-sided.

<figure><img src="/files/QjWF88YfrUxEfyv9K2RG" alt=""><figcaption><p><em>Backface Culling Camera checkbox can be found in Material Properties > Settings.</em></p></figcaption></figure>

<figure><img src="/files/r2pddt72sLdOdVWUsspS" alt=""><figcaption><p><em>A half sphere with backface culling on (left) and backface culling off (right).</em></p></figcaption></figure>

## 5. Single Image UV's

Support for UDIM textures in Simulon is experimental, so it's recommended to use single image UVs. This means mapping a section or the entire mesh to a 0-1 UV space, corresponding to a single image texture.

<figure><img src="/files/go1fk5EiWbg4fbrITLlg" alt=""><figcaption><p><em>UV’s of a mesh mapped to a 0-1 UV space.</em></p></figcaption></figure>

***

## Materials

This guide focuses on a standard metallic/roughness PBR workflow and the setup with Blender's Principle BSDF shader. For more complex materials, refer to our Advanced Material Guide.

The standard PBR workflow supports the following channels:

1. Base Color
2. Roughness and Metallic
3. Normal Map
4. Baked Ambient Occlusion (only used in the on-device realtime preview)
5. Emission
6. Specular
7. Clearcoat
8. Sheen
9. Alpha
10. Transmission
11. IOR
12. Volume

## 1. Base Color

When you connect an Image Texture node to the Base Color input of the Principled BSDF node, that image becomes the base color for the static 3D asset.

<figure><img src="/files/Mr0gn6xf1C17rk77c5yl" alt=""><figcaption><p><em>Image Texture node containing the base color image texture, connected to the Base Color channel of the Principled BSDF.</em></p></figcaption></figure>

If no image texture is connected, the color specified on the Base Color channel will be used as the base color.

<figure><img src="/files/oVlkCgwsuF2Q2Sol9gxF" alt=""><figcaption><p><em>Using Principled BSDF node’s Base Color as the static 3D asset’s base color.</em></p></figcaption></figure>

## 2. Roughness and Metallic

The Roughness and Metallic channels can also be controlled using an image texture. However, they differ from the Base Color channel in that they use a Non-Color Color Space. Always ensure the Color Space is set to Non-Color in the Image Texture node when using Roughness and Metallic images.

Optionally, you can pack roughness and metallic maps into the same image, with roughness in the green (G) channel and metallic in the blue (B) channel of an RGB image. In Blender, it's recommended to connect the Image Texture node to a Separate RGB node. This separates the channels, allowing you to connect the Green channel to the Roughness input and the Blue channel to the Metallic input of the Principled BSDF node.

<figure><img src="/files/oBXGndQtSfB70IE7mMjq" alt=""><figcaption><p><em>A packed roughness and metallic Image Texture node, split using a Separate Color node.</em></p></figcaption></figure>

If no image texture is connected to these channels, the Principled BDSF node will display sliders with values between 0.0 and 1.0 to control these channels.

<figure><img src="/files/hrusVnHyM0SMia0JFsrK" alt=""><figcaption><p><em>A Principled BSDF node without an image texture connected to the Roughness and Metallic channels.</em></p></figcaption></figure>

## 3. Normal Map

When using a normal map, connect the Image Texture node containing the normal map to a Normal Map node, then connect this to the Normal channel of the Principled BSDF node. To adjust the normal map's strength, use the settings in the Normal Map node. Set the Color Space of the normal map's Image Texture node to Non-Color, similar to the roughness and metallic Image Texture nodes.

<figure><img src="/files/PEr7BAPamd7BW4mep189" alt=""><figcaption><p><em>Using a normal map in your static 3D asset material.</em></p></figcaption></figure>

## 4. Baked Ambient Occlusion

Using a baked ambient occlusion map is optional and does not contribute to final renders in Simulon. Baked ambient occlusion differs from the standard method of connecting an Image Texture node to a Principled BSDF node channel. To ensure correct ambient occlusion functionality, create a custom node group named "glTF Material Output" with an Occlusion input channel. Then, connect the Image Texture node containing the baked ambient occlusion image texture to the occlusion channel of this custom node group.

{% hint style="info" %}
**Tip**

To create the custom node group for baked ambient occlusion, begin by grouping an Ambient Occlusion node. Enter the node group, delete the Ambient Occlusion node, and remove all group output channels. Next, delete all group input channels except the Color channel and rename it to Occlusion. Exit the node group and rename the entire node group to "glTF Material Output."
{% endhint %}

The ambient occlusion won't appear in Blender because it uses a different method for showing ambient occlusion that is incompatible with glTF. However, when using the custom node group named "glTF Material Output," the ambient occlusion will be correctly included in the glTF upon export. Like with roughness and metallic Image Texture nodes, ensure the Color Space is set to Non-Color.

<figure><img src="/files/WmUs6OAtSqsy4ztHwhmK" alt=""><figcaption><p><em>Baked ambient occlusion Image Texture node connected to a custom node group named glTF Material Output.</em></p></figcaption></figure>

<figure><img src="/files/r0lTsRZmQpbuz15iOscJ" alt=""><figcaption><p><em>Inside the custom node group named glTF Material Output.</em></p></figcaption></figure>

Optionally, you could also pack the baked ambient occlusion in the red (R) channel of the same RGB image with the roughness and metallic channels.

<figure><img src="/files/hLqQiKLqCUHXGKd34cpr" alt=""><figcaption><p><em>Baked ambient occlusion packed with roughness and metallic in a single Image Texture node.</em></p></figcaption></figure>

## 5. Emission

To enable emission, connect an Image Texture node with the emission image texture to the Emission channel. However, to control the emission more effectively, link the Image Texture node to an Emission node and then combine it with the Principled BSDF node using an Add Shader node. This allows you to override the emission value in the Emission node.

<figure><img src="/files/3tkvqi3WZB7pf9m7bncj" alt=""><figcaption><p><em>Emission strength controlled using an Emission node.</em></p></figcaption></figure>

## 6. Specular

When using a specular map, connect the Image Texture node containing the specular map to the Specular IOR Level channel of the Principled BSDF node. Set the Color Space for the specular map to Non-Color. If the specular map contains color, use a separate Image Texture node with the color specular map, setting the Color Space to sRGB. Then, connect this Image Texture node to the Specular Tint channel of the Principled BSDF node.

<figure><img src="/files/S15hEJjaUFqtlf3TljRB" alt=""><figcaption><p><em>Specular Image Texture node connected to the Specular IOR Level channel of the Principled BSDF.</em></p></figcaption></figure>

## 7. Clearcoat

You can connect an Image Texture node containing the clearcoat image texture directly to the clearcoat channel of the Principled BSDF node. The same applies to a clearcoat roughness image texture. If no image texture is connected to these channels, adjust them using sliders in the Principled BSDF node, with values ranging from 0.0 to 1.0.

For an alternative approach, pack the clearcoat and clearcoat roughness into a single RGB image for glTF. Place the clearcoat image texture in the red (R) channel and the clearcoat roughness image texture in the green (G) channel.

<figure><img src="/files/OPOveyq5zmEjBGrPlXJ3" alt=""><figcaption><p><em>An Image Texture node containing a packed clearcoat and clearcoat roughness image texture, split using a Separate Color node.</em></p></figcaption></figure>

## 8. Sheen

\
If sheen roughness is part of your material, pack the sheen image texture in the alpha (A) channel of the sheen Image Texture node.

Set the Color Space for the sheen map to Non-Color. If the sheen map contains color, similar to the specular map, use a separate Image Texture node for the color sheen map, setting its Color Space to sRGB. Then, connect this Image Texture node to the Sheen Tint channel of the Principled BSDF node.

<figure><img src="/files/UWlztkFTpjKeHgeCEIbg" alt=""><figcaption><p><em>Sheen Roughness and Sheen Color connected to their associated channels in the Principled BSDF node.</em></p></figcaption></figure>

{% hint style="warning" %}
**Note**

You will notice that there is a difference between how Blender renders Sheen, compared to how glTF renders Sheen. This is due to Sheen not being fully compatible between Blender and glTF.
{% endhint %}

## 9. Alpha

Alpha controls the transparency of a material. To use an image texture for this, connect an Image Texture node with the alpha image texture to the Alpha channel of the Principled BSDF node. Then, set the Render Method to either Blended or Dithered, based on your desired transparency effect. You can find Render Method options in the Material Properties tab under Settings > Surface > Render Method.

Alternatively, pack the alpha image texture in the alpha (A) channel of the base color image texture. Connect the alpha output of this Image Texture node to the Alpha channel of the Principled BSDF node.

<figure><img src="/files/1ezQvUv1c1EPaXO3pCAN" alt=""><figcaption><p><em>Base color Image Texture node with packed Alpha and Render Method set to Blended.</em></p></figcaption></figure>

{% hint style="warning" %}
**Note**

The Blended Render Method is complex for real-time engines to render, and often results in transparency sorting issues. This specifically happens when a singular mesh has a singular material, but shares various material properties controlled by textures.
{% endhint %}

{% hint style="info" %}
**Tip**

To avoid transparency sorting issues, while using Blended Render Method, you could separate the mesh that uses that specific material property that requires transparency. If this is not an option, a Math node set to Round can be used to avoid these transparency issues. To do this, connect the alpha output of Image Texture node with the Value channel of a Math node set to Round, and connect the Value output of that Round node to the Alpha channel of the Principled BSDF node.

Note, that using this method will result in a "cutout" transparency similar to the Alpha Clip blend mode of previous Blender versions.
{% endhint %}

## 10. Transmission

Transmission, which simulates materials that refract light like glass, differs from alpha blending as it also allows for specular reflections, which alpha blending does not.

To control transmission using an image texture, connect an Image Texture node containing the transmission image texture to the Transmission Weight channel of the Principled BSDF node. Ensure the Color Space of the transmission Image Texture node is set to Non-Color.

<figure><img src="/files/S0fQv2zikLuNCKrtY4XJ" alt=""><figcaption><p><em>Transmission Image Texture node connected to the Transmission Weight channel of the Principled BSDF.</em></p></figcaption></figure>

If no image texture is connected to these channels, the Principled BDSF node will display sliders with values between 0.0 and 1.0 to control these channels.

{% hint style="info" %}
**Tip**

If you want to enable refraction on your material, Transmission must be used in addition with Volume. Volume is covered later in the guide.
{% endhint %}

{% hint style="warning" %}
**Note**

Transmission is also complex for real-time engines to render. It is therefore recommended, to separate the part of the mesh that only uses Transmission, and create a material for Transmission only on that particular mesh piece.
{% endhint %}

## 11. IOR

IOR, or Index of Refraction, is important when using Transmission, Volume, or Specular properties. Control the IOR value by inputting the desired value that corresponds to the transmissive material you wish to replicate.

<figure><img src="/files/iyvc4BztqBUHdDOrB2kd" alt=""><figcaption><p><em>IOR set to a value of 1.330 to mimic water.</em></p></figcaption></figure>

## 12. Volume

To use volume effects, set Transmission on the Principled BSDF node. Volume is configured by connecting a Volume Absorption node to the Volume input of the Material Output node. The Volume Absorption node allows you to control two values: Color and Density.

Volume thickness can be adjusted using a thickness image texture, which should be packed in the green (G) channel of an RGB image. Connect the Image Texture node with this thickness image texture to a Separate RGB node. Then, route the output from the Green channel of the Separate RGB node to the Thickness channel of a custom group node named "glTF Material Output node."

<figure><img src="/files/APVNmN0RFKzqEsp2ht3B" alt=""><figcaption><p><em>The use of a Volume Absorption node and a thickness image texture to control volume thickness.</em></p></figcaption></figure>

***

## Pack Image Resources

For Simulon to successfully read the textures of the 3D asset's materials,  textures need to be packed as resources. This can be done by navigating to File > External Data and select Pack Resources.&#x20;

<figure><img src="/files/o1KxKrzLxPrYaglmcQm7" alt=""><figcaption><p><em>The Pack Resources option can be found in File > External Data.</em> </p></figcaption></figure>

***

## Native Blender Features

Using `.blend` (or `.blend.zip` ) as a format offers a much broader creative scope for creating 3D assets than `.glb` or `.usdz`. Features such as modifiers, particles, physics, and more become possible and enable the creation of more technically complex 3D assets.

{% hint style="warning" %}
**Note**

When uploading a Blend file, make sure the scene is optimized and that there are no unwanted or additional objects that could influence the final render.
{% endhint %}


# Adding Animation

Preparing an animated 3D asset for Simulon follows the same steps as a static 3D asset, but includes the additional step of setting up the animation. As before, we will walk through this process.

## Animations

A animations are configured using NLA tracks in Blender or added into an exported .glb or .usdz file. Before setting up the animated 3D asset using NLA tracks, several steps must be completed to ensure the animation functions correctly in Simulon. You can determine what animations will be picked up in the Simulon mobile app by looking at the Simulon Animation panel. This will help you to see whether your animations have been setup correctly.

<figure><img src="/files/hVUG0ZOzPsrtnmubIodF" alt="" width="375"><figcaption></figcaption></figure>

## Ground Contact

Ensure your asset correctly touches the ground, as this determines its spawn position in Simulon relative to the real-world surface.&#x20;

If you are in Blender, use the X-axis line as your ground/surface reference. In orthographic view, position the base of your mesh directly over the X-axis line.

<figure><img src="/files/vqd90qKhfX89K34rOuVy" alt=""><figcaption><p><em>3D asset incorrect positioning by intersecting below the x-axis line vs correct positioning above the x-axis line.</em></p></figcaption></figure>

## Origin

Like static 3D assets, it is essential to place the animated 3D asset at the origin, particularly for multiple animations, to ensure consistent positioning at the start of all animations.

In addition to positioning the animated 3D asset at the origin, it is recommended to have it front-facing to ensure that the animation occurs towards the camera.

<figure><img src="/files/Ugm4puCyMezel7nZDlyy" alt=""><figcaption><p><em>A sequence of three different animations initiated consistently at the origin.</em></p></figcaption></figure>

## NLA Setup

\
Animations in Blender are created from actions and NLA tracks. While Simulon can read animations saved as actions, using NLA tracks is the recommended approach. Before employing the NLA Editor to create NLA tracks, you must first create actions from your animations.

Creating an action involves animating an object or armature by setting keyframes that define its movement, rotation, and scale over time. These keyframes are recorded in the Action Editor as a sequence of poses, forming an action.

<figure><img src="/files/PfDfPKjtGyroPEcPloYS" alt=""><figcaption><p><em>Idle action selected in Action Editor.</em></p></figcaption></figure>

To convert an action into an NLA track, add the action as a strip by stashing or pushing down the action into the NLA track. Name the NLA track appropriately to reflect the animation. Once uploaded to Simulon, the animation will appear under the name given to the NLA tracks.

<figure><img src="/files/s2gU4eFNyGUvnuRiwRwY" alt=""><figcaption><p><em>Push Down Action button in the NLA Editor.</em></p></figcaption></figure>

{% hint style="info" %}
**Tip**

NLA tracks are read in the reverse order. Therefore, to set the order of animations for Simulon, arrange the NLA tracks from bottom to top.
{% endhint %}

It is recommended to set the animated 3D asset’s first animation as an idle or static animation. This is to ensure that the animated 3D asset stays in screens space once instantiated.

The Simulon Asset Preparation plugin gives the ability to also push down all root animations with a specified name. When root animations are detected, a warning will appear with a text box and button called "Create Animation from Root Actions". This allows you to easily create new animations for multiple objects and load them into an NLA Track with a specified name.&#x20;

<figure><img src="/files/bfYzxkeX2GY8mnQkAjVM" alt="" width="375"><figcaption></figcaption></figure>

## Alembic

Simulon has support for Alembic geometry caches. Currently this only works for fixed geometry caches but **not** alembic emitters.&#x20;

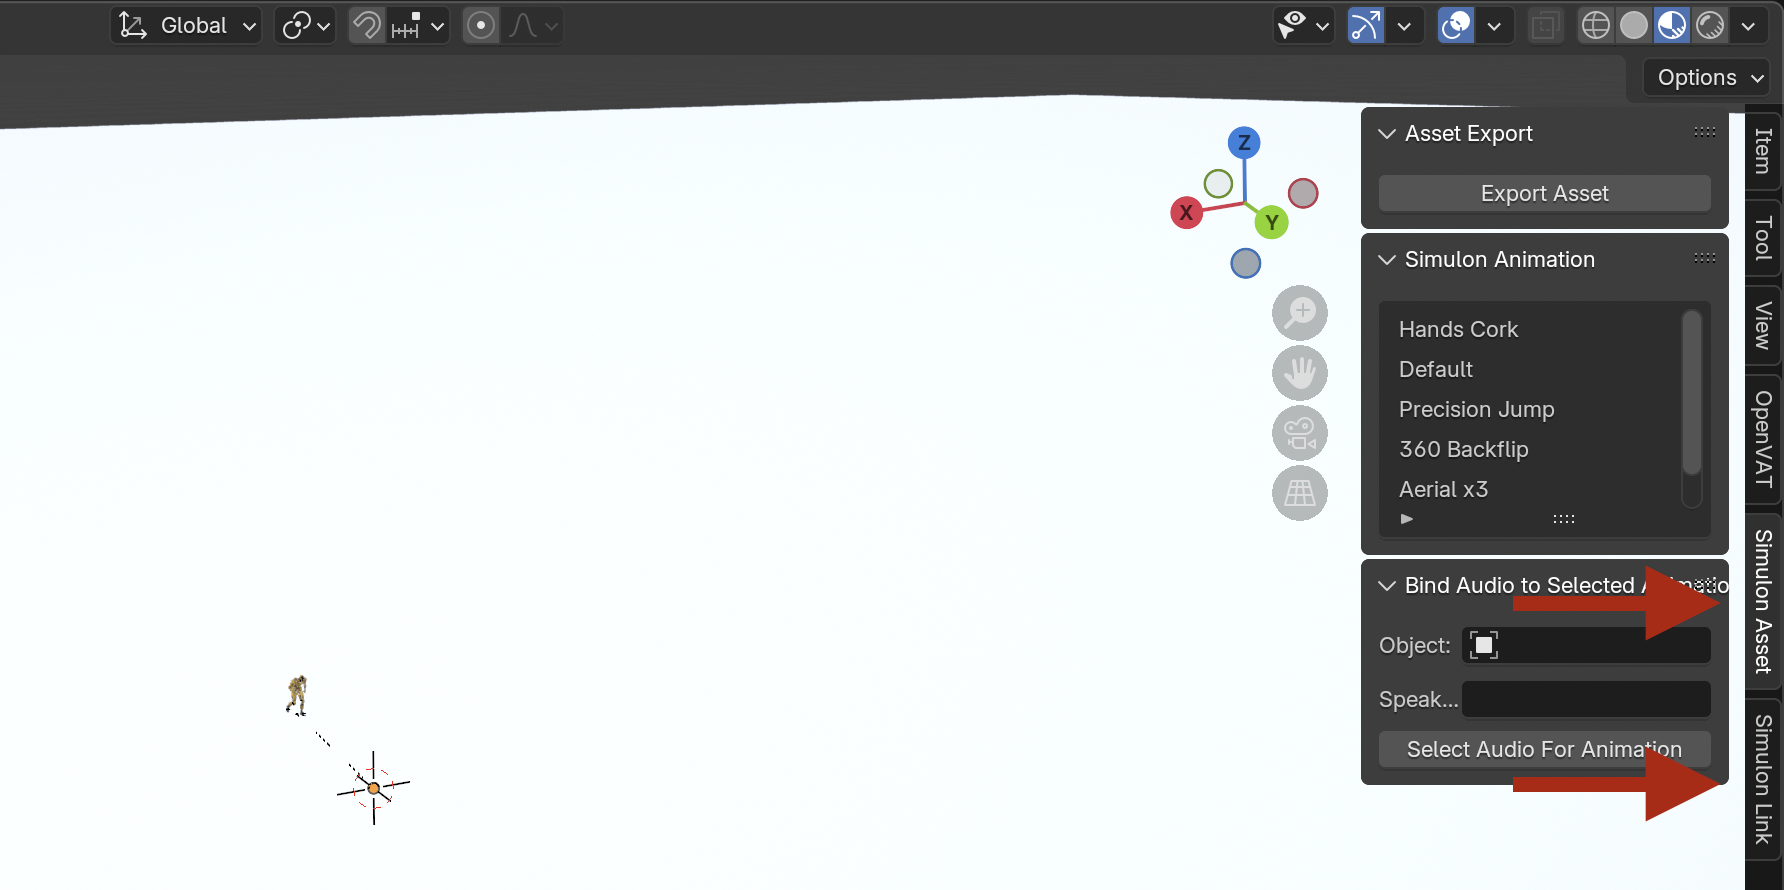
In Blender you can import you .abc file. Here it will setup a MeshCacheSequence modifier or a TransformCache modifier. If you simply upload this .blend a default animation will be created for the alembic file. But if you'd like to bind the alembic to a specific animation you can use the "Bind Alembic" tab. When you select an object with alembic attached this tab will appear. You can then select the animation you wish to bind it to and click "Bind Alembic to Selected Animation". You can also select multiple alembic objects and use "Bind Multiple Alembic to Selected Animation".&#x20;

<figure><img src="/files/vcKfWxNPudqdL5xjgLBT" alt=""><figcaption></figcaption></figure>


# Exporting your Asset

Exporting your asset from Blender for Simulon is simple using the Asset Preparation plugin.

After you've completed setting up your asset in Blender, you need to export it correctly for Simulon. The Asset Preparation plugin makes this easy for by providing an "Export Asset" button.&#x20;

<figure><img src="/files/0X1XTbCxxAUembfMwToo" alt="" width="563"><figcaption></figcaption></figure>

When you click this button you'll be prompted for an output folder. The plugin will then collect all the resources linked to your asset and pack the resources into the `.blend`, or into a `.zip` if they are external files such as images sequences, UDIMs or videos. The file output will either be an `asset.blend` or `asset.zip` file.

<figure><img src="/files/GnmfMc1QCSkAfyXAIwTQ" alt=""><figcaption></figcaption></figure>

Once the export is complete you're ready to upload that file to Simulon.


# Uploading your asset

Uploading your asset to Simulon is straightforward and hassle-free.

{% embed url="<https://drive.google.com/file/d/1BnWK9Yj3TQQVgajIeR-qsi42DmX9ahon/view?usp=sharing>" %}